
Mike Hoover's Art In Stone – The Basics
Knife Scale Stone Art Tutorial - By: Mike Hoover (AAPK Username: Redrummd) - redrummd@comcast.net
1) SAFETY FIRST –
Before I start getting into all of the details and work necessary to put stone scales on a knife I want to go over the huge safety issues associated with what I do. Each knife is in my hands in a cold water spray for an average of 4 hours per knife. The equipment used is turning at 1700 to 1800 RPM. I have spent many thousands to buy equipment that I SPECIFICALLY CHOSE WITH SAFETY IN MIND. Most of you know how dangerous a buffer is to use and every piece of equipment and every second I have a knife held against a grinding, sanding or polishing wheel has the same potential dangers.
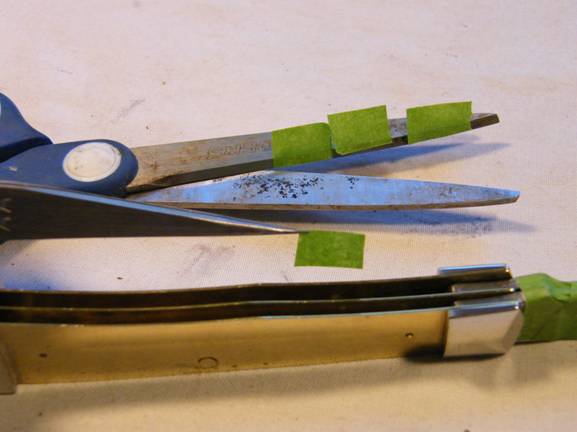
Any time a knife is touching a spinning wheel the blade MUST be taped and I put about 3 layers at the tip as I use that as the control handle during all of the work. I take all photo’s with the equipment off for both safety and to keep water spray from the camera.
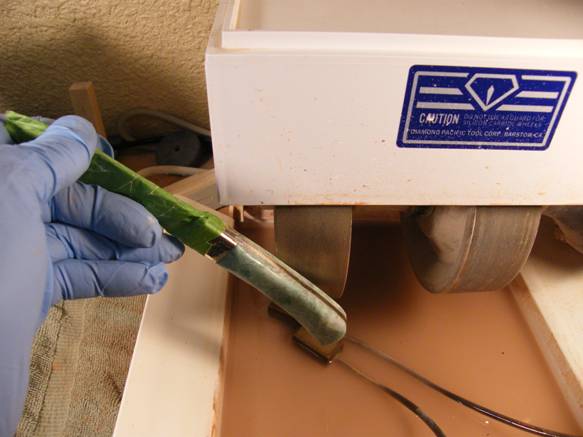
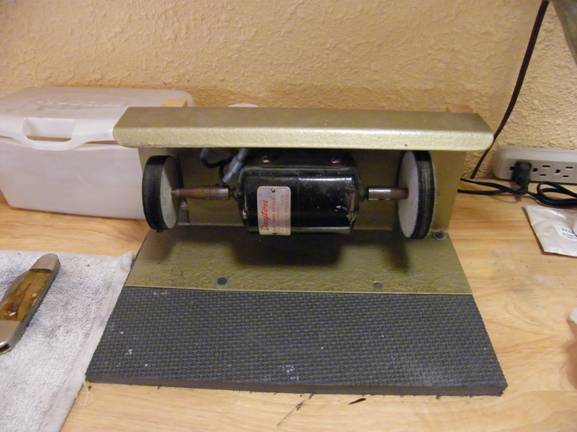
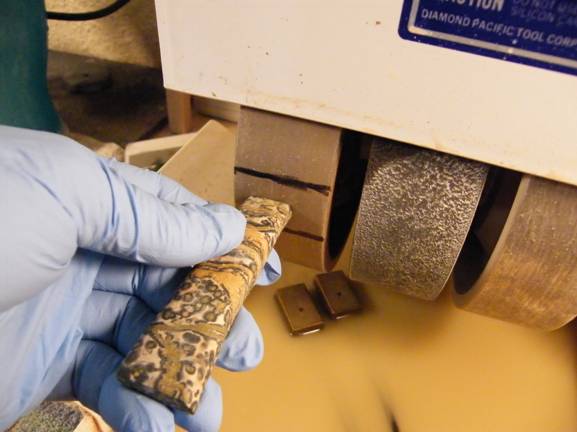
Although I have a total of 22 wet grinding wheels set up, it is possible to do pocket knives on a smaller machine. I would recommend the Diamond Pacific Genie as the smallest one that is safe to use. To do the grinding work safely on a smaller machine like the Genie, only two wheels can be used on a shaft at the same time. The knife blade should always be worked out from the sides to ensure the safest possible work and to ensure the knife or your hand does not hit the other wheel.
It takes less than five minutes to change the wheels on the Genie once you do it a few times. I have quite a few spacers to accommodate any combination of grinding wheels or NOVA diamond sanding wheels. They can be made very cheaply by using ¾ inch plastic pipe fittings carried at most hardware stores. I have a crescent wrench I keep on the bench next to the Genie’s as I change the configurations a lot. I have the 60 grit and 200 grit sintered diamond wheels set up in this these pictures.
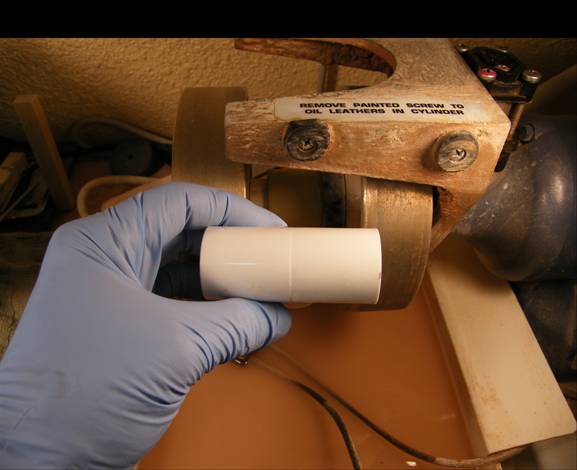
I wear gloves most of the time I am working in the shop. The cold water and rock dust are not kind to your skin and most days I have my hands in a water spray for several hours. This is a ¾ inch pipe fitting and I use these to cut my own spacers any width needed.
As it is rather unlikely that many will even consider the number of machines I have set up to work stone, it is possible to do stonework with a Diamond Pacific Genie, Titan or a Covington expanding drum setup. You just need to spend more time reconfiguring the equipment. I personally have 3 diamond bladed saws with a 16 inch saw, a trim saw and one is a diamond bladed bandsaw. I have two 6 wheel Diamond Pacific Genies. I have a total of 12 wheels on Covington arbors. I have 4 variable speed polishing and buffing stations and one cardboard wheel setup for sharpening.
For detail work I have two lithium battery powered Dremels and two Foredom variable speed units.
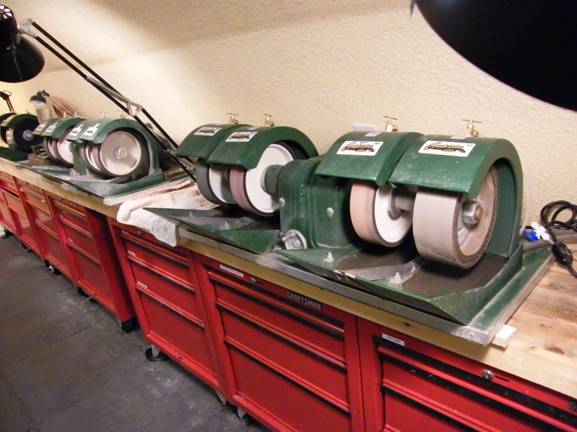
Here are a few pictures on the equipment and benches used. The main work station is the work area at the window.
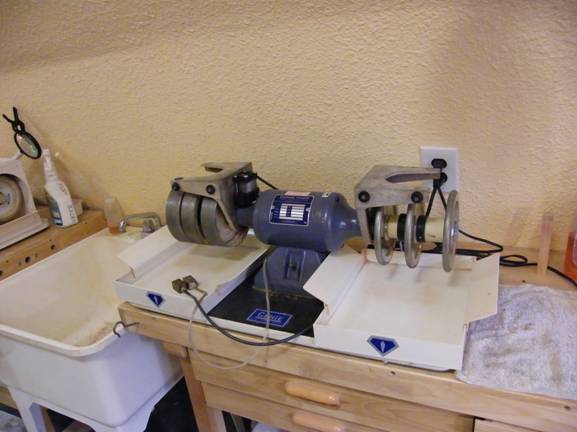
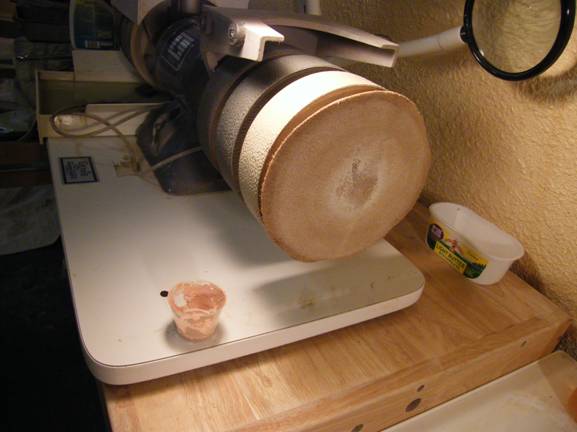
This is one of the two Genies. This one is set up for doing the rough shaping of the scales which is done with the stone before being adhered to the knife. This is the roughest grinding and usually if a stone has flaws it fails in the rough cutting stage which is a good thing. I would rather cut another scale or two before I get to the point of polishing and have a stone scale fail in the polishing stage.
The wheels on the right on this Diamond Pacific Genie are used for carving curves and they go to 600 grit. I have to hand finish and hand polish the stone from 600 to polish so I do not often do knives requiring small curves such as for a spine lock.
This Diamond Pacific Genie is set up for doing the fitting of the stone scales to the proper length and angles for where they meet the metal bolsters and for the final grinding after the stone scales are on the knife. It is also used for polishing the ends of each stone scale before I adhere them to the knife.
Note that I do not need to reconfigure the side of this machine with the sanding wheels as I only use them for sanding the ends of scales where the scale meet the bolster. This stage is done before adhering the stone scale to the knife. I do all of the other sanding, pre-polishing and polishing on the large Covington’s. One Covington is set up for the rough wet sanding; one for the pre-polishing and one for the final diamond polishing.

This is the diamond bandsaw. I really like it as it wastes so little stone as it will basically allow cutting around corners and allows for following the curves needed for most knives. You can see the handle of the trusty crescent wrench for switching the configuration on the Genie sticking out a bit between it and the Genie and the 280 grit NOVA wheel.
This bandsaw does not drain worth a darn so I have found it works best to put the entire saw into a large baking pan on two 2 x 4’s and I dump the water out after filling the reservoir a couple of times. I have it set up with a foot petal so I can run and stop it with both hands on the stone I am cutting. Although you can touch the blade lightly while it is running and not get cut you do need to ensure that you keep your finger pressure on the stone in a direction that is AWAY from the blade. I was cutting a piece of dinosaur bone that broke and I jammed my finger into the blade and it did cut me right on the end of my finger. It wasn’t deep enough to need stitches but it sure did hurt.
Here are the Covington’s. They are the workhorses. One is set up for doing all of the rough sanding with 60, 140, 280, and 600 grit diamond NOVA wheels. The closest one is set up for pre-polishing with 1200, 3000, and 8000 grit diamond NOVA wheels.
The closest wheel is an expanding drum with a 6000 grit diamond belt on it. I use this wheel on stone with a mix of stone with different sections or elements with different hardness and for things like mammoth tooth that have the same issue. In a mix of hard and softer stone or tooth the softer one cuts faster. This creates “waves” or low and high spots when using the stiff NOVA wheels. The expanding drums are much softer and allows the belt to cut the high spots down and results in a much better polish of the material.
I have to put adsorbent mats down on the floor when I use them and I wear a waterproof full length apron as they create a pretty good mist when running. Each wheel is in its own housing and I use duct tape between the wheels on the housings to keep the water from running down between the individual housings and in the drain pans. I even put towels on the counter at the ends to catch the spray. I think they designed these to use outdoors. They cut at least 10 times faster than the Genie so they are worth the trouble.
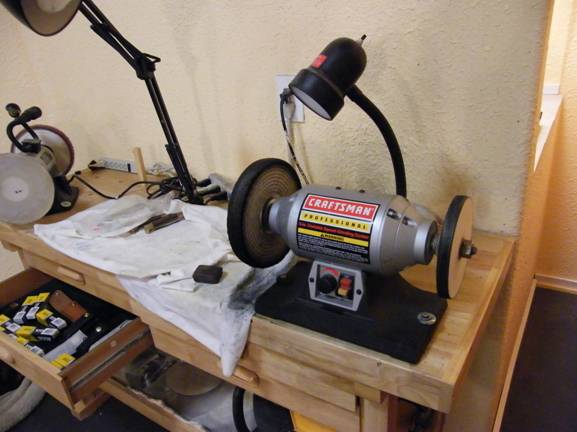
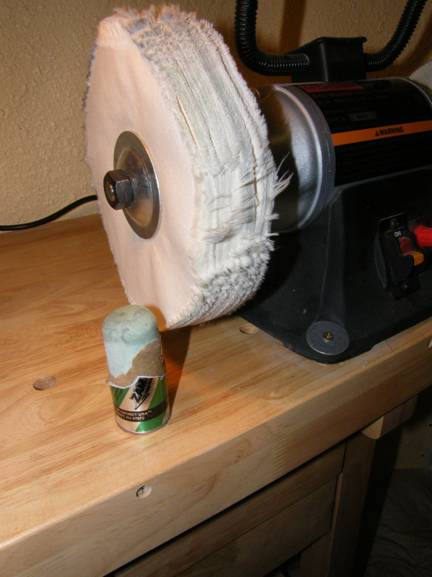
This is one of four variable speed grinders set up for polishing stations. This one is set up for Tripoli polishing of metal. One side is a hard felt wheel and the other is two ½ inch thick buffing wheels.
The others are set up for finer polishing; diamond paste polishing of stone on leather pads; and polishing of ivory and tooth with ZAM, a polish also used on soft stone such as turquoise.
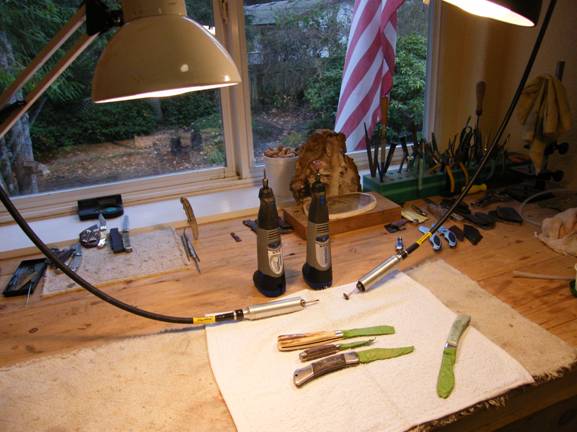
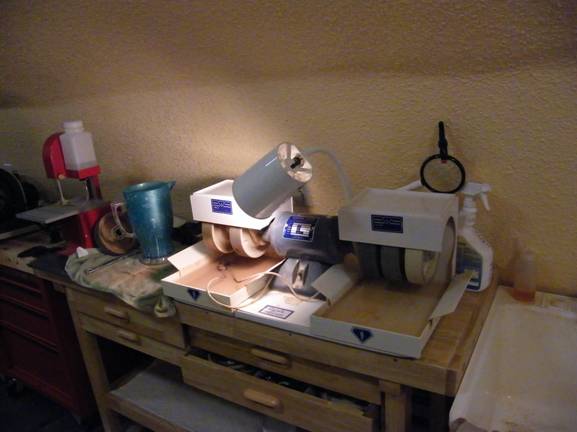
This is the main work bench where I do the disassembly; assembly; cleaning; photography; stone layout and beer drinking. I have the two lithium Dremel’s and the two Foredom units set up for use here. If you need to pick only one - go with the lithium Dremel.
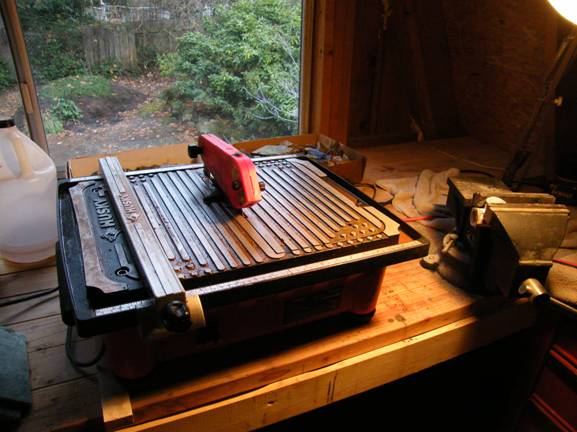
This is the diamond bladed trim saw that is used to cut most of the blank scales from stone slabs. It is a basic tile saw that I use mineral oil in. It cost half of what a slab saw sells for and does the same task. I have “upgraded” it with a larger blade designed for stone cutting. It is an inch bigger and about half as thick as the blade that came with the tile cutting saw. Mineral oil means I do not need to worry about rust or lubrication of the saw and it allows for cutting the stone faster.
I have the saws set up outside the heated main workroom to keep the oil mist from getting all over everything in the main work areas.
My shop has two floors each 24 by 32 feet. The first floor has a mechanics pit and is actually my car workshop and home for the 69 Chevelle SS.
If you can only afford one polishing unit I suggest getting a small variable speed one such as this. It has a foot petal and the spindles are threaded so that the wheels and buffs can be easily and quickly changed. I suggest storing them in a zip lock bag with the polish agent used on them to prevent cross contamination. I use this for touch up polishing. It is on the work bench directly to the right on the main work area. I use this one for touching up.
3) KNIFE DISASSEMBLY AND PREPARATION –
There are a lot of different ways knives are assembled, even with different knives by the same company. The easiest ones to take apart are ones with flush fit pins. These are usually just glued on. I put them with the blade(s) opened on my workbench and pull one of the 75 watt lights down to where it is just about touching the knife to heat it up. When it is hot I grab it by the blade with a towel with the spine up. I use a razor sharp knife to push straight down where the liner and scale meet. The scale usually pries off easily. Do not twist the knife or you will put bends and nicks in the liners.
The reason I use a towel is for safety in holding the knife by the back of the blade while prying straight down with my sharp knife. SAFETY FIRST in all you do in a knife shop.

Ones with peined pins are taken apart by first using a cutoff wheel to cut the heads off or down far enough to get to the actual pin. I use the lithium Dremel’s with 1 inch wheels that are .05 thick on a mandrel. It is important to wear safety glasses as these wheels do occasionally self destruct with flying pieces. I cut the pins off at an angle to prevent having the wheel grab the scale and run into the bolster. If you badly gouge the bolster you have a fresh knife for the “junk” bin. Once the pins are cut the scales usually pry off easily. Occasionally you get a knife that also has glue so heating with the light may be wise if the scale does not easily come loose.
Once the scales are off, I carefully cut off the scale pins if they are solidly attached to the liner. If they are not solid I push them through and get the head out. It is better to leave them so that you do not need to tape over the holes they leave from the inside when using the adhesive for attaching the stone to the liner.
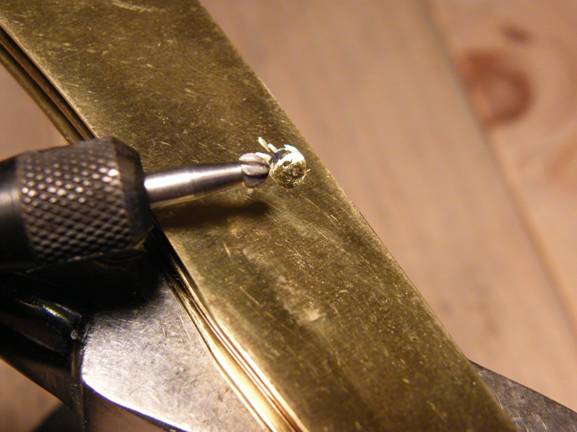
The spring pin is the center one and I do not take that one out. I cut it off flush on one side of the knife and if it is brass, I use a small carbide round cutter that is about 1/8 inch across, to cup the pin and liner to about 1/3 the thickness of the liner.
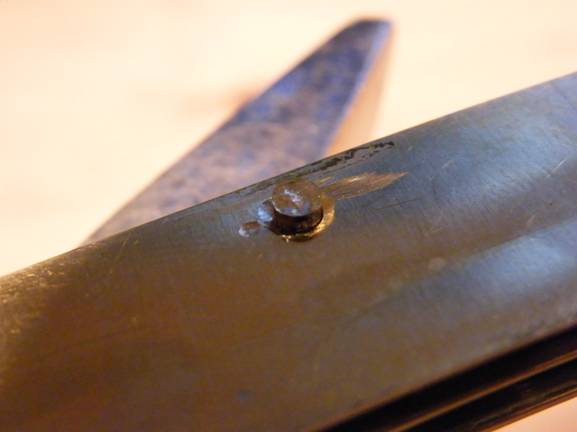
I then flip the knife over and tap the pin out the side I just cupped until it is sticking out above the liner on the cupped side a bit less than the width if the pin. So, I would tap out a 1/8 inch pin a bit less than 1/8 inch above the liner on the side that is already cupped. I then cut off the pin flush with the side of the liner that has not yet been cupped. I then cup the pin and liner the same as I had done on the other side.
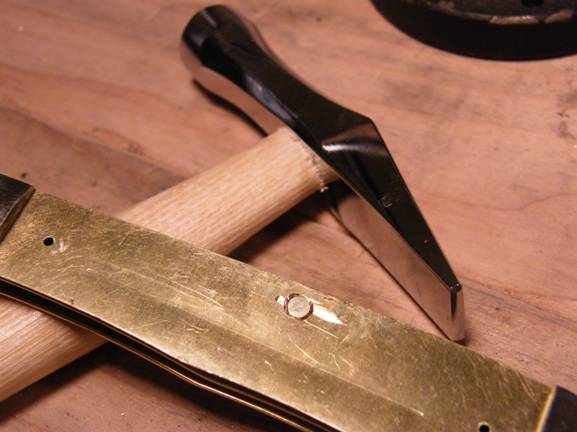
Now that both sides are cupped, I pein the pin down to fill the cup on each side. It is okay to get the pin fairly tight and I keep checking the open and close of the knife to be sure I do not over tighten the peining of the pin. Once I have it as tight as I want I file the pin flat to the liner on both sides.
Some knives have steel pins and liners. I cup the steel pins and liners with a nearly worn out cut off wheel that is about ¼ inch to 1/3 inch across. The hardened steel tip I use for the brass is not fine enough or hard enough to cup the steel.
SAFETY GLASSES ARE A MUST USE PIECE OF SAFETY EQUIPMENT FOR ALL OF THIS.
HINT – Try using a knife with no rear bolster for a first attempt or a Buck 505, 503 or 501 when you first start as they are the easiest to do in many ways. The Buck knives center pivot is already peined and cupped flush! There is no glue on their scales and they are designed with a “V” sided scale allowing for a whole lot of forgiveness in fitting the scale tight. I may mention some of this a few times. The Buck 501 even comes with a sheath.
4) SLAB CUTTING and SELECTION –
The actual cutting of stone slabs may be best left to a shop or dealer who has a large saw. I would recommend at least a 16 inch saw as the best all around when considering the blade width to diameter of the saw. I want the thinnest blade possible when cutting very expensive gem stone.
The real problem you face is finding SOLID stone. This needs to be repeated a dozen times - The real problem you face is finding SOLID stone. The real problem you face is finding SOLID stone. Ect.
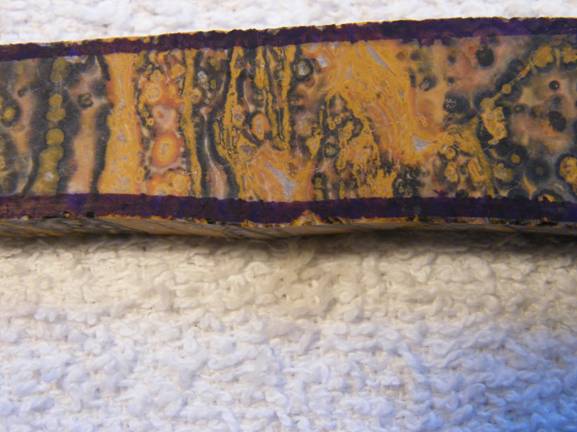
Almost all stone has pits, vugs, drusy, fractures and microfractures. I have the resources and equipment to deal with some of these issues or to work around them. If you only have a tile saw and a Genie you need to be certain you are dealing with SOLID stone. If you go to a gem show or a rock shop take a magnifying glass or optivisor magnifying headgear and really look at the stone for flaws. Try to find stone that has a porcelain look to the structure.
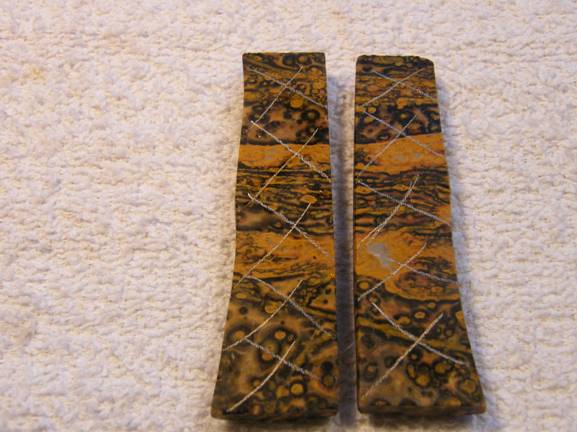
There is a ‘secret” to seeing many hidden flaws. Get the stone wet. Watch it as it dries. Water will stay in the pits and even in microfractures longer than on the solid stone. So, the flaws will show up as wet spots or tiny lines. The tiny lines are usually microfractures and will most likely fail. Read that as break while you are working on the scale. You need to mark these flaws using a pencil or an aluminum rod. I do not recommend felt markers for this as they can stain or indelibly mark some stone. The aluminum “pencil” is really neat and I have them in several locations in my shop. The marks show very well and do not easily wash off. I consider them a required shop tool.
5) STONE SLAB SCALE LAYOUT –
Felt markers are a really useful tool but care must be taken when using them. I know from experience what stones can be safely marked and I use them for the layout. If you know that that the mark will be ground off fully it is safe to use one on any stone as the marker will not stain deeply.
The really good thing about the permanent marker is it does not wash off with mineral oil or water so it is an excellent mark for the saw cuts and initial grinding phase.
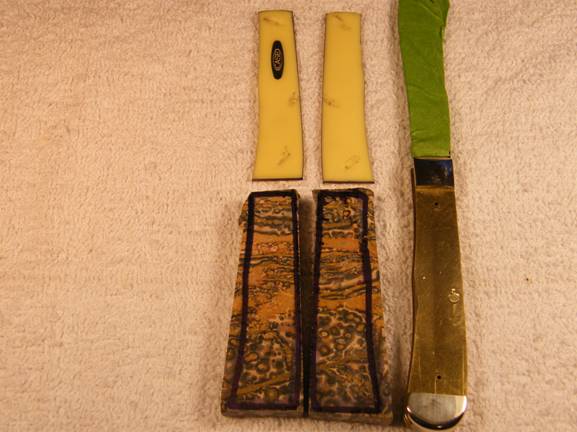
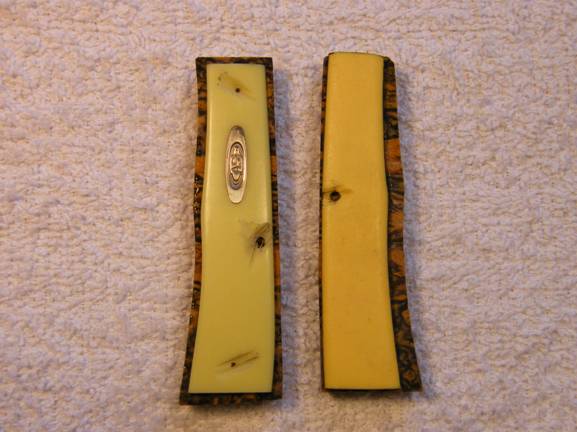
To get the best looking stone scales the layout on a slab is best with the scales laid out spine to spine on the slab. Nearly all knives are displayed with the spine up.
Even better, is using two slabs cut one after the other. These are called sister slabs and allows for nearly the same stone pattern on both sides of the knife.
With some stone neither of these is practical so you have to settle for trying to find two sections that have the same flow and color, especially at the spine.
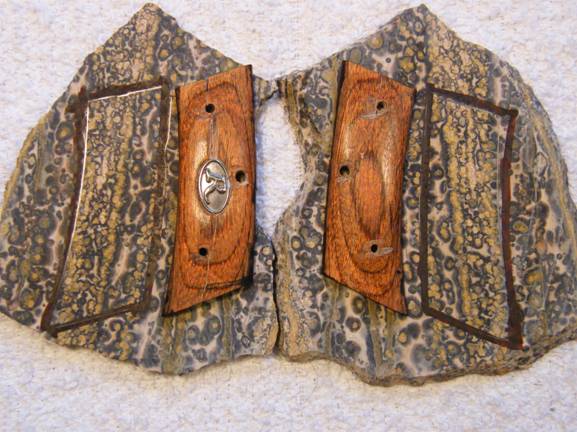
In all cases, always try to pick the best piece of stone for the left side of the knife as you look at the knife spine with the blade(s) forward. That is the side most people display.
6) BLANK CREATION AND GRINDING PHASE –
Once the slab has been marked and cut it is time to start grinding. The Genie comes an 80 grit diamond wheel that can be used to take the rough cut to the felt marker line. There is a lot of vibration in this phase and this is where most stone failures occur. I have learned to support the stone with my fingers pretty much under the contact patch to avoid breaking the scale during this phase.
The rough wheel causes chips along the edges so care must be taken to ensure none of the chipping goes beyond the marker line. It is important to be sure that all of the cuts around the blank are very close to 90 degrees to the wheel to ensure a proper fit.
Once the rough cut to shape is finished the grinding wheel is used to curve all of the edges over as the start for the fitting stage. It is best to not cut along the length of the scale as that causes the most chips and breakage. The rough grinding wheels cuts at least 5 times as fast as the finer grinding wheel so there needs to be a balance between how much of the cutting you do with the rough cut as compared to breaking of the scales and time spent. Unless you have a lot of cutting experience it would be better to spend more time slowly cutting on the fine grinding wheel.
Another reason it is important to do the rounding of the edges is to ensure you do not forget which side of the stone you started on or you may very well end up with either two left scales or two right ones….

Once you get it roughed out take it to the fine wheel and smooth out the grinding marks from the course wheel and grind the edges enough to get out the chips from the rough grinding. Be certain the knife has it’s blade taped. You need to be sure you do not go too far in the cutting by test fitting the stone to the knife. You should plan to have about 1/16 inch of stone bigger all the way around, than the scale you removed.
The most important aspect of this rough shaping is to ensure that when you are finished you have 90 degree ends for the start of the fitting stage. You can hold the scale against a vertical surface to ensure you are very close to square. You cannot get a tight fit unless you can keep everything square.
When I first started I frequently check the stone scale with one I had removed from the knife. To do this you use the right hand removed scale to check the left hand stone scale and the left to check the right scale by putting the flat sides against each other.
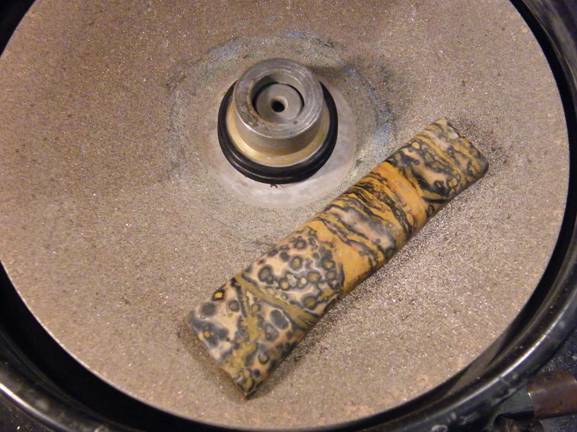
The last part of the rough fit is to get the back of the stone scale absolutely flat. The Genie has a flat lap attachment that can be used on the ends of the main shaft. I have a dedicated flat lap machine that I use.
To do this you take an aluminum “pencil” and put several “x’s” on the back of the scale and then lap the scales until the marks are removed. You need about a 180 grit finished surface for good adhesion to the knife bolsters so you do not want a polished back to the stone scale.
HINT – Try using a Buck 505, 503 or 501 when you first start as they are the easiest to do in many ways. They are designed with a “V” sided scale allowing for a whole lot of forgiveness in fitting the scale tight. Another possible choice for early attempts would be knives with no rear bolster.
The proper cut to size and fitting to the bolsters of a knife is the most difficult aspect of cutting stone knife scales. On the grinding wheel there is a “sweet spot” that you do all of the cutting in. In a comfortable working position it is the very edge of the curve at the level you are working plus about ¾ inch above and below. As you work the stone and maintain the 90 degree angle you will “feel” it when you go out of the “sweet spot” both above and below. You want to stay within the spot and use the entire diamond grinding wheel from side to side to ensure you wear the wheel evenly.
I probably should note that every time you change the Genie’s configuration, flip all of the wheels to run in the other direction. It will help ensure even wear and they cut better when you do this as you get a fresh diamond edge on the diamond layer that is exposed and cutting.
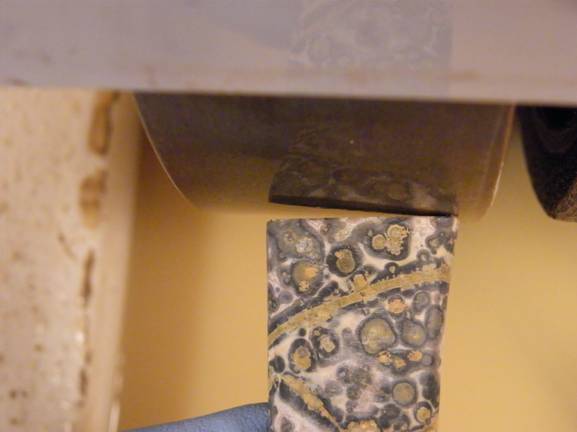
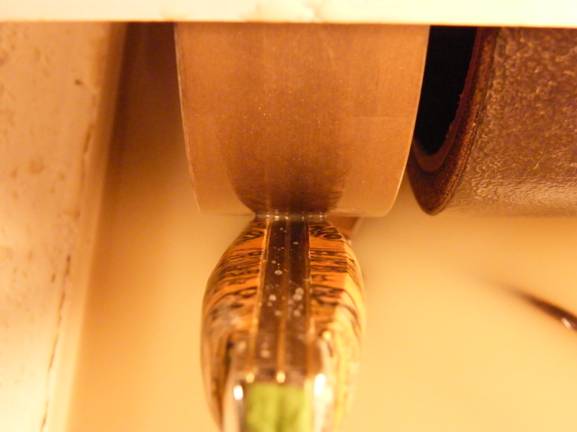
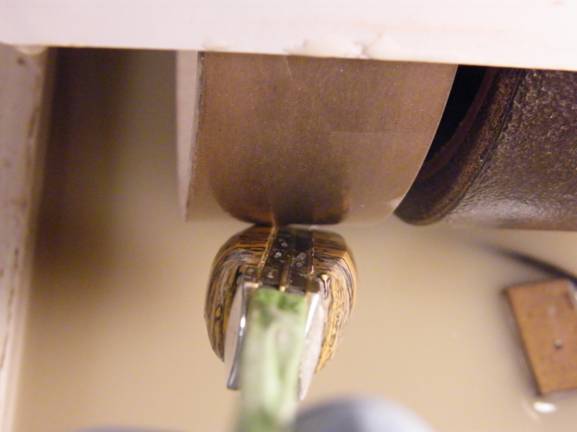
Until you are confident you can eye a 90 degree edge it is real easy to get a good idea how close you are by simply pushing the end you are cutting against the wheel housing. This piece is actually at 90 degrees but the angle of the camera distorts it a bit. It is kind of tough getting good photo angles when holding the stone scale with one hand and the camera with the other hand.
As soon as you have the 90 degree cut you need to start checking the length of the scale frequently on the knife. BE CERTAIN YOU HAVE THE BLADE PROPERLY TAPED. You line up the scale to be straight to the sides of the knife and look for a gap where the stone scale meets the bolster. I like to start with the bottom bolster as it is the wider one and once you get it correct the top narrower one is easier to get aligned and cut the correct length.
Take a mental note of the width of the gap. You will be holding the same the scale to create the same gap against the diamond grinding wheel in the sweet spot. The stone scale should be touching the grinding wheel at the same point it is touching the bolster. The point is to hold the scale and grind off the same shaped wedge from where the stone is now touching the metal of the bolster. I almost always grind with the display side to be certain I have the grind “square” to the face that shows.
If you hold the same gap, and the same point of contact of the stone to the knife bolster in the grinding wheel sweet spot, once the entire stone bolster is touching the diamond wheel you will be “square” to the knife frame. You also need to ensure you keep the 90 degree edge. This really is the toughest aspect of stone knife scales to master with the front one being even more challenging as you need to be certain you have the 90 degree edge; the angles square to the knife frame AND get the length perfect.
Once you have the rear square repeat on the front edge by doing exactly the same steps. I usually use a aluminum pencil to mark the approximate length I will need and use the rough diamond wheel to get to about 1/10 of an inch of the needed length. You need about a tenth to be sure you have no edge chips that will show and room to get the 90 degree and square to the frame aspects right.
Once you are very close start to use very light pressure against the grinding wheel so that you are only taking off a thousandth of an inch on each pass or two. You need to constantly check for the proper length while maintaining the other aspects of the cut right. When you get REALLY close to the right length one side or the other of the stone scale will suddenly drop in if you rock the scale from side to side. That is when you need to only use pressure against the grinder on the side that will not yet drop in.
When it does drop in you will have a very tight fitting stone scale which is just fine as the metal of the knife expands more than the stone so there will be no chipping or breaking of the stone due to expansion.
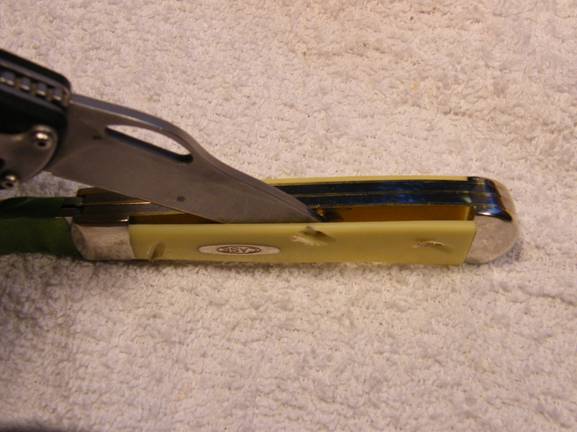
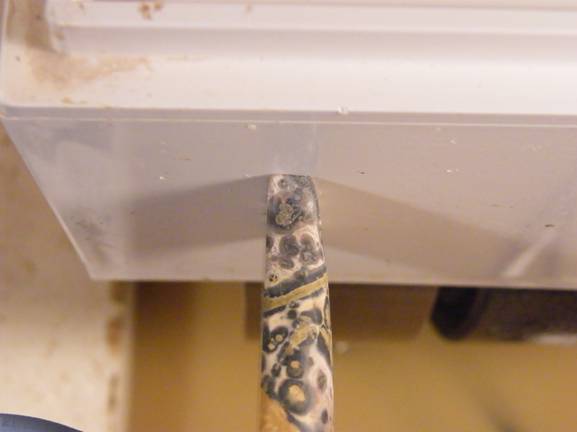
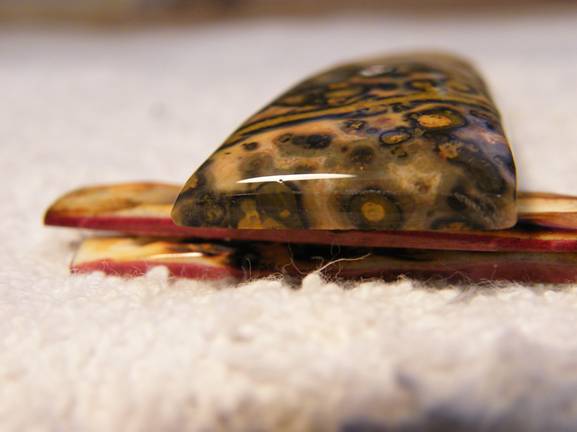
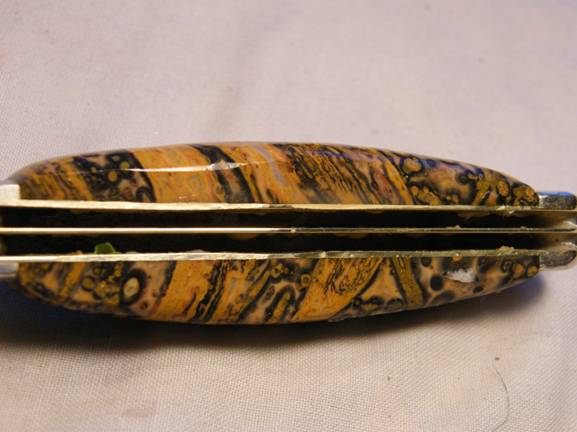
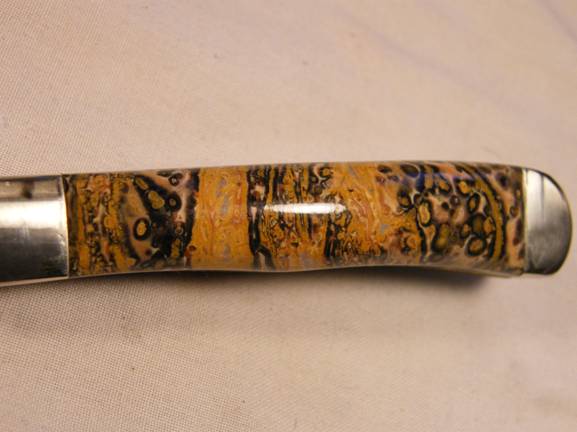
You know you have a good fit when you can turn the knife upside down and all around without the rough fit stone scale falling out. You can see that there is a bit of room left on both sides of the knife and there are no visible chips. The picture below is of the knife being held with the stone scale upside down. There is no adhesive holding the stone, just the tight fit against the metal bolsters.
8) BOLSTER FIT AND STONE FINISH –
The hardest most technical part is now behind you as is the point at which the stone scale was most likely to break. As you are still grinding on the scale before it is adhered to the liner there is still risk that the scale will fail but you usually are no longer using the rough grinder. Now it is really a matter of attention to detail to get everything good enough to get the knife into your “personal collection” grade. So get the aluminum pencil and sharpen it to a fine point on the grinding wheel.
Be certain there is no “crud” at the bottom of the bolster and that the scale fits perfectly flat along the spine and both bolsters. The edge of the liner at the blade well may be off just a bit. I find this to be a common minor issue that is corrected when the stone is adhered to the liner.
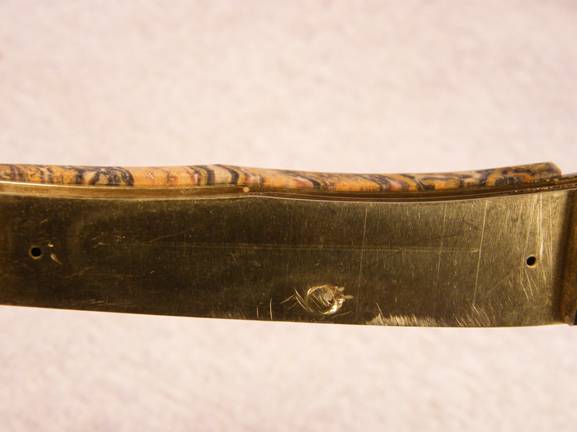
Mark both ends of the stone scale at the point the stone touches the top of the bolster. On this Case XX large trapper the front bolster has a nice curve upward in the center while the back one is nearly flat across. You do not need to worry about getting the sides marked as that is sanded and polished when the face of the stone scale is polished.
Once the stone is marked you start cutting the curve into the stone. This is where you start to bring your personal touch to the scales. You can bring the cut up to the face sharply or very gradually. Don’t forget to support the scale with your finger(s) directly behind the point of the scale in contact with the grinder. You use the grinder to shape the stone to close but not touching the aluminum mark on the stone on both ends. The scale should look like the one in the next photo.
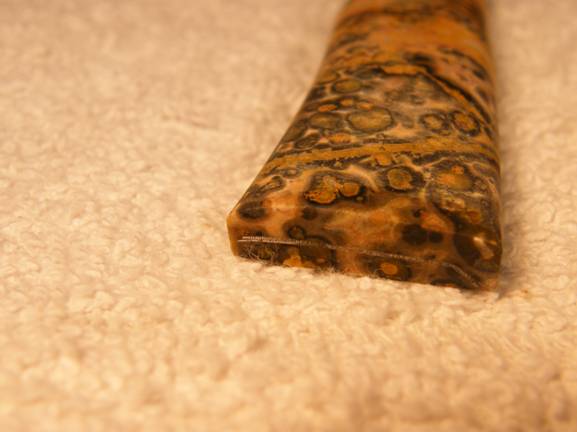
This is what the scale should look like when you are finished with the fine grinding wheel. Note that I pretty much took the cut straight across and just tapered the edges a bit to feather in the grinds toward the middle of the scale. This scale is now ready for the 280 grit NOVA wheel. You are now sanding the scale and you sand the ends smooth and down until the aluminum mark is almost gone. The stone scale should now look like the next photo.
This is how the scale should look when you are finished wit the 280 grit wheel. Note that the sides are tapered but not really close to the aluminum guide mark.
You then use the 600 grit NOVA wheel to sand until the aluminum mark is totally removed AND NO FURTHER. The 600 Grit sanding is the last one that really removes much material. Test fit the scale to verify enough stone was removed. If too much was removed I use a hard foam block and a sheet of 600 grit black wet or dry sandpaper to sand the bolster down as needed. I have a collection of several shapes and types of foam sanding blocks that I bought at an automotive pain store that carries the black wet or dry paper.
After the test fit finish the usual sanding and polishing steps. I use the Genie’s stock setup through the prepolish which is 1200 and 3000 grit.
The final step of this stage is the polish stages which for my setup is the 14,000 and 50,000 diamond belts on the expanding drums of the 2 wheel Covington I have setup for polishing.
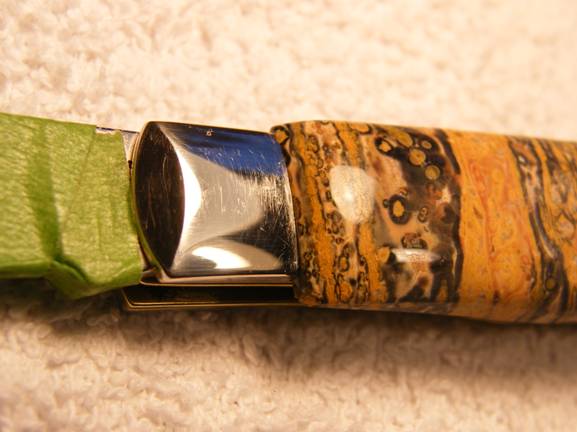
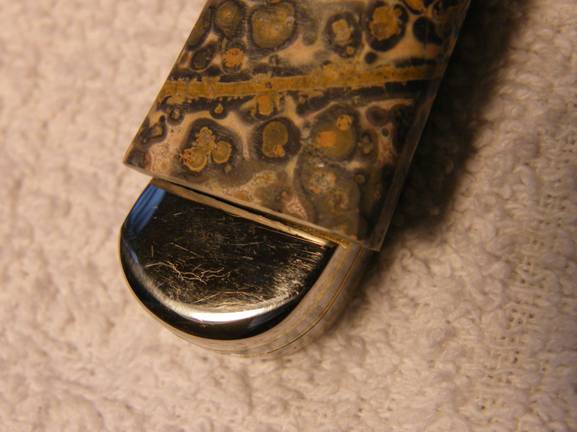
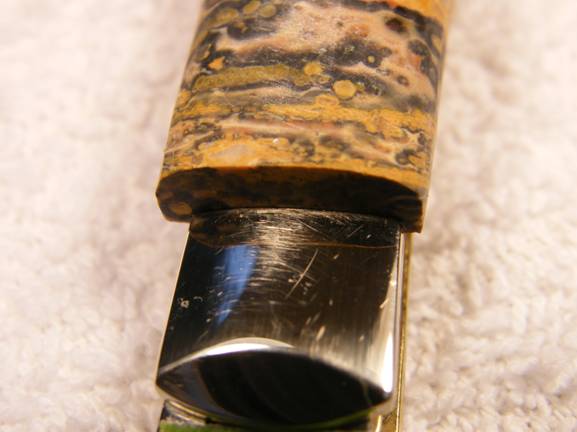
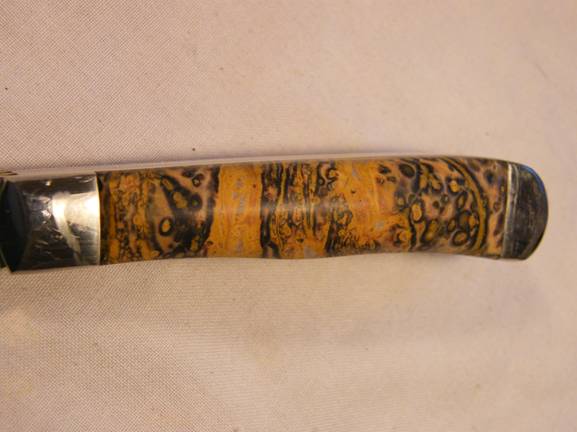
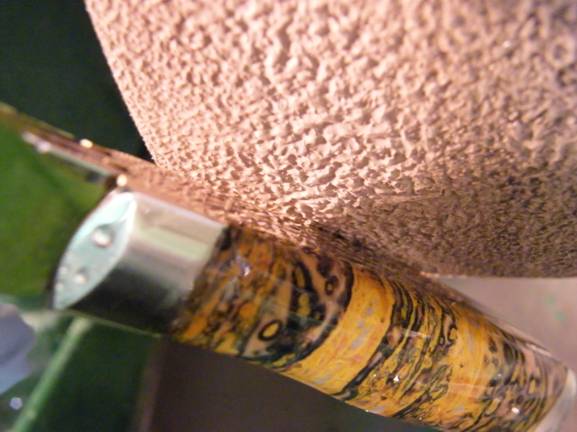
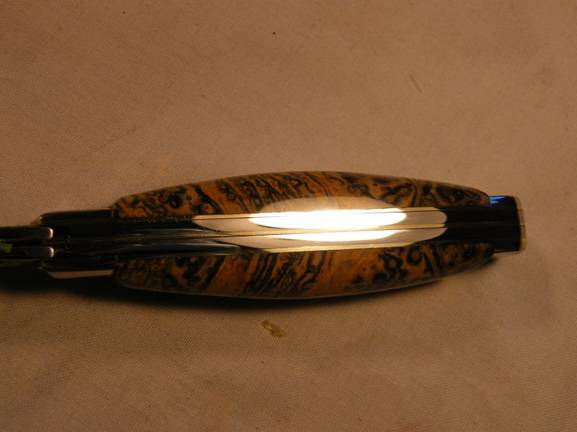
This is how the polished ends now look. At this point you have to be concerned about any contamination of the stone scales that would cause a failure in the adhesion of the stone to the knife liners. I now always use gloves when grinding, sanding and polishing.
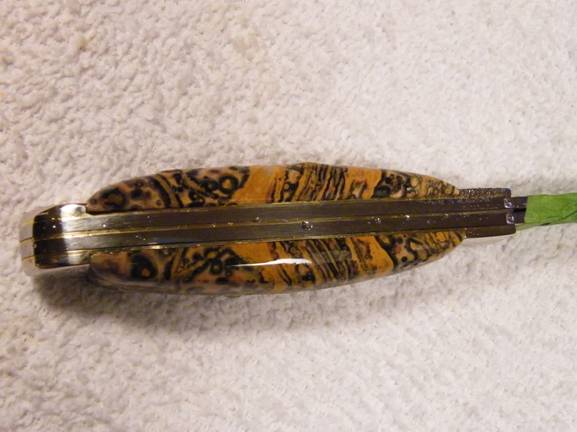
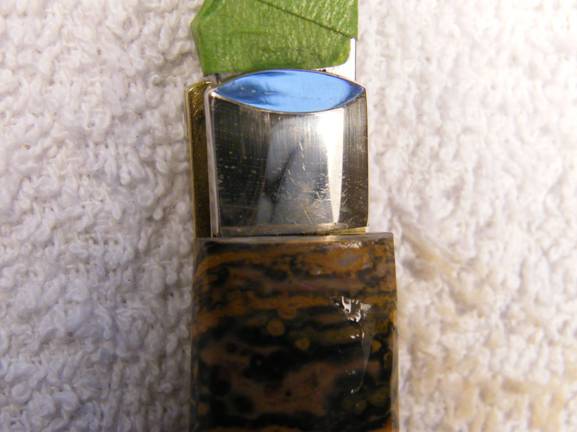
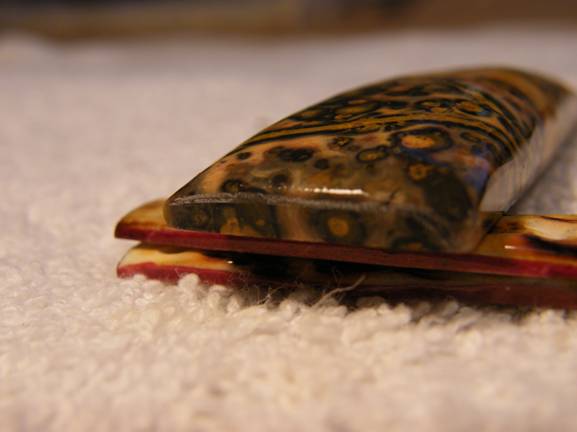
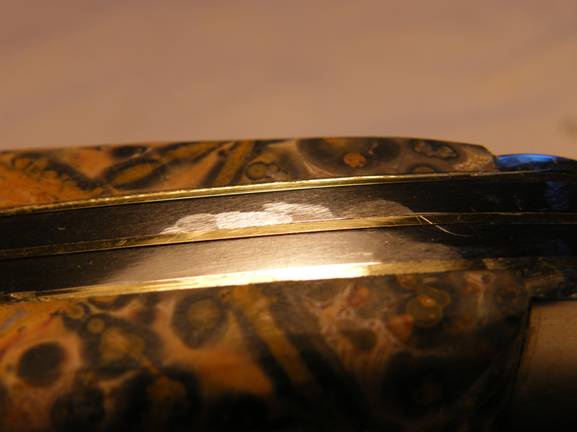
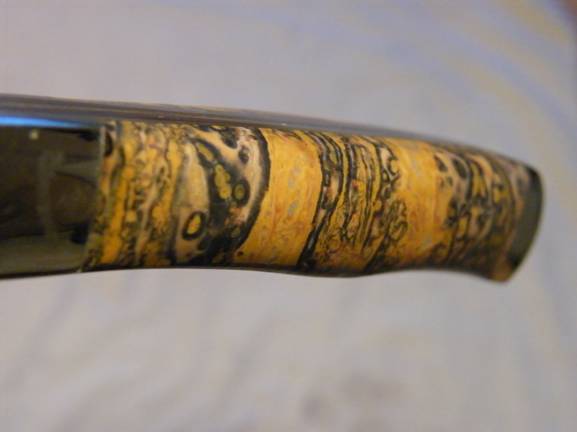
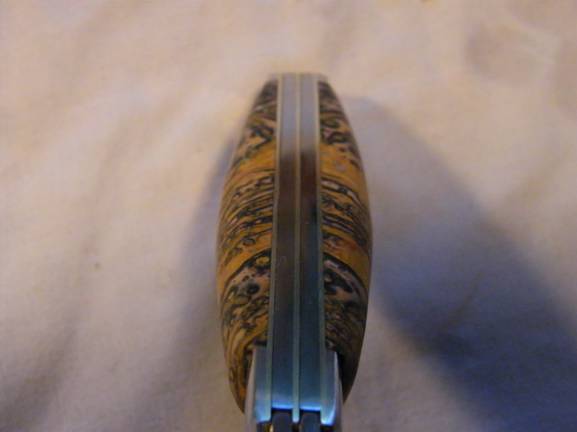
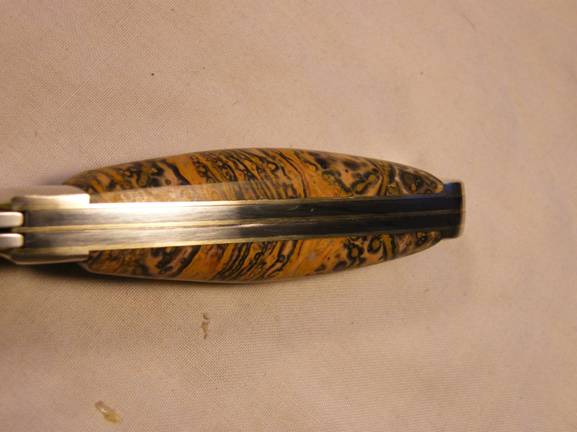
This picture shows a lot of details. Note the tight fit at the spine and at both bolsters and how the pattern match looks from the spine view. You can also see the basic taper line I set up. This is my full sexy cut which will have a lot of smooth curves and it will feel really nice in your hand.
9) KNIFE ASSEMBLY FOR FINAL FINISHING –
Once I get to this point I usually let the stone and knife dry out overnight.

I use Loctite 325 and the 7075 activator. The Loctite 325 has a bit more tolerance to thermal expansion than some of the other closely related Loctite adhesives. Stone and metal expand at different rates so I have decided this works best for what I do.
I only spray the activator on the back of the stone. I do this on a clean paper towel just before I do the metal preparation work on the liners as the activator needs to “dry” out a bit. It doesn’t really get dry but it is ready when it no longer “smells” wet.
I use the “0” file to roughen up the liners near the bolsters and then the 36 grit sanding drum to roughen up the rest of the liner. EXTREME care needs to be taken to not allow the 36 grit wheel to run into the bolster as it really makes a mess of the edge of the bolster and you have already cut the stone scale to the right length so you can’t file a new straight edge into the bolster without having to cut a new stone scale. I use my finger to protect the edge of the bolster – WEAR A GLOVE if you are going to do this. I don’t run the Dremel at too high of a speed to do the rough up. You also need to be sure not to gouge the edges of the liners especially on the side next to the spine as those cuts will show.
You need to tape over any holes in the liners from inside the knife well. You may need to clean the metal with “Goof Off” to get them to stick. If you are doing a Buck 110 you need to make a very tiny piece to cover the rear hole up near the spine. You need to put that piece on the outside of the liner as you cannot get to it from the inside. That hole is above the spring and you do not want any adhesive getting in there.
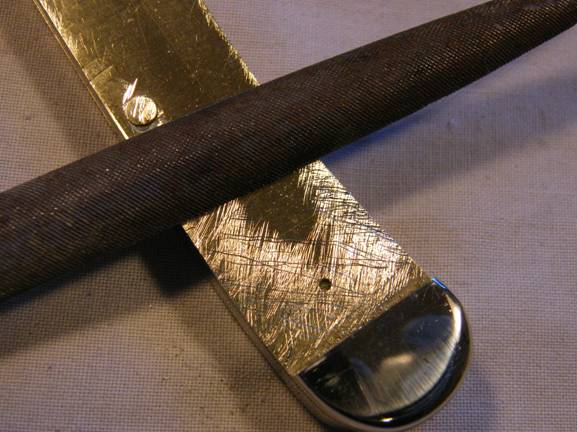
This is what the “0” file rough up looks like when I am finished doing it.
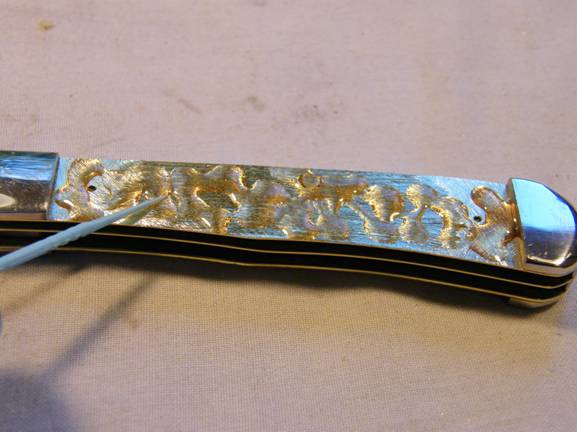
As I noted earlier, I only put the activator on the back of the stone. I only put the Loctite 325 on the liner and I spread it with a plastic toothpick, being sure to get all of the liner covered and the ends of the bolsters.
Once you put the stone onto the liner you have about a minute to move it around to get it lined up and about a total of another two minutes to get it clamped down tight. If you do not get it done in about three minutes any gaps you have may remain and you cannot get the stone back off. This adhesive is incredibly strong.
TOP SECRET - If you really mess up and you really have to either get the stone off or toss the knife you can usually get Loctite 325 to release. It is not 100% safe and does not always work but here are the two tricks to try.
- Put the knife under a light bulb until it is too hot to touch. Take your hardest pry knife and use the same straight down process you use to take off a scale as noted in section 3. If it does not come off don’t push to the point of breaking the stone yet. Go to alternate two.
- Put the knife in a pan of cold water and slowly bring it to a boil. Try to pry the scale off as noted in section 3.
Remember – BLADE DOWN AND PRY FROM THE SPINE WHILE HOLDING THE BLADE WITH A TOWEL. SAFETY FIRST.
This will not work with Loctite 324 and is another reason I use Loctite 325 even though Loctite 324 has much better shear strength. If you use Loctite 324 the stone will break before the adhesive lets go.
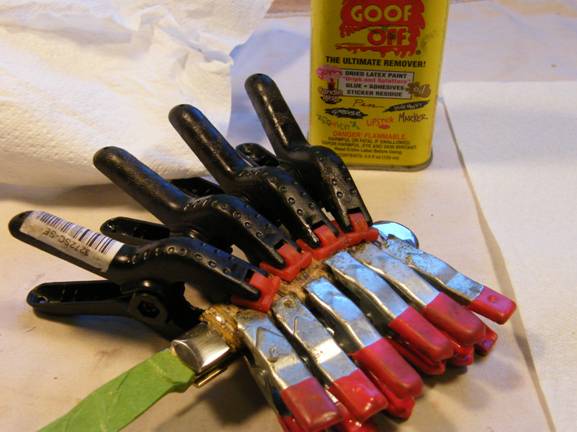
This is what a clamped knife looks like. I start with one black one on the spine and then fill the well with the small ones. I then go back to the spine and fill it. The stone is rounded and sometimes the black clamps what to slide off and shoot around the room. This usually happens when you are clamping on the 2nd stone scale as you are clamping too two curved stone scales instead of one stone scale and a roughed up metal liner. If you cover the stone with a paper towel that will reduce the slipping to near zero.
The clamps only need to be on for about 15 minutes as by then the adhesive is pretty much set. I take off the clamps and use one of the plastic epoxy mixing knives to clean off as much of the Loctite 325 as I can. The most important areas are at the point the stone meets the bolsters and along the spine. You really need to try to not get any of the adhesive between the spring(s) and liners as even without the activator it does thicken and will “gunk” up the snap. Once I remove the clamps, I use “Goof Off” to clean as much as possible of the adhesive that has oozed out.
I usually let the glued knives sit until the next day before I start the 2 nd grinding phase.
The grind to the well is pretty straight forward. Grind down until you hit the liner and lightly hit the bolsters. You need to put your desired curve up to the top of the stone. You will need at least a slight curve up to the middle of the stone scale to get the stone polished. A slight curve is necessary to get all of the scratches out as you move from one grit to another.
Grinding to the spine is the 2 nd most difficult technical aspect with only the fitting being more difficult to master. Carefully grind straight across until you are nearly touching the metal of the spine. YOU DO NOT WANT TO ACTUALLY HIT THE SPINE WITH THE GRINDING WHEEL. If you hit the spine the grinder puts deep curved cuts into the spine that require an incredible amount of sanding to remove. I have been there and done that far too many times and I have really learned to be careful here. This is as close as you want to get.
This is the technical trick that will save you countless hours in sanding. Finish the grind on each side with the knife held off the grinding wheel a few degrees. You can take the stone all the way to the metal if you are careful or leave the slightest bit of stone to sand off. Really take your time with this element as an extra 5 minutes here will save you at least 15 minutes with the sanding wheel, not to mention the wear and tear aspect.
Okay, so I still have my failures. These are very light scratches but will take me an few minutes to remove and I will be doing it on a Covington. These were caused as I was trying to line up the angle for the cut on the right side of the knife which is worked “blind” as I cannot see that side when I work it. I will not work a knife angled in toward the other grinding wheel so there is always a side I have to work blind.
11) SANDING PHASE - STONE AND METAL –
Once you are happy with the shape of the stone the grinding is finished. You should have the stone curved all the way to the middle of the scale and any curves cut as you want them. The grinding wheel is much faster than a sanding belt and a lot less expensive to use when you consider wear and replacement costs. Although from this point on I am using my Covington’s the work can be done on a Genie. You just need to configure both sides with two sanding wheels. 280 and 600 on one side and the 1,200 and 3,000 on the other. It will be slower going but it can be done and done safely.
Remember, it will take less time to reconfigure the equipment to use only 4 NOVA wheels than trying to work the knife up and down on the wheels in the usual 6 wheel configuration AND it is not safe to do so.
After the 140 grit NOVA wheel the shape is apparent. I use a 60 grit diamond NOVA wheel to quickly cut the intended shape of the stone but it is not used to sand the metal of the spine as the wheel will leave deep scratches that are hard to get out.
The 140 grit NOVA diamond wheel is used to sand out the 60 grit marks in the stone and to bring the stone and metal on the spine flush. This is how the knife looks after finishing with the 140 grit stage. The shape is now about finished and there is a low spot on the backspring in the factory finish that is highlighted with a felt marker in the next picture.

Low spots in backsprings from the factory are not uncommon. I can spot them easily as the finish is different from the factory than what is left by the NOVA sanding wheels. I took a Sharpie felt marker and marked the metal and made a couple of passes on the NOVA wheel to show this pattern created by the low spot.
After 600 grit you can now see a sheen in the finish of the stone and any scratches from the previous grits shows easily if there are any.
This is how the metal finish looks after the 600 grit sanding and you can see the clean line in the stone where the top cut meets the side of the knife.
12) POLISHING PHASE – STONE AND METAL –
One of the hardest things for me to figure out was how to get a good finish on the spine of the knife. No one told me how to keep from gouging the spine and I started by grinding the stone and spine flat across. I eventually figured out how to tilt the knife a few degrees to taper the stone to the spine. I then slowly figured out better ways to get a show worthy polish on the spine. So far I have had to figure out each and every step as no one was willing to explain how they cut and polish stone scales.
I really do not know why no one would help as if you have read this far you can see this isn’t exactly something anyone wanting stone scales on a knife can do. It requires a huge investment in equipment and since an average knife takes 8 hours of work to complete – I sure am not making any money. I still have knives selling for less than I have in them in actual costs. In fact in November 2008 I had two on Ebay sell for the opening bid of $24.99. Out of that I had to pay Ebay listing and selling fees and Paypal fees. The lucky two that got those knives probably have no idea just how incredible a deal they got.
After nearly 300 knives I am just now being able to at least break even in that I am no longer subsidizing my work with savings. So, now that I have rambled on for three paragraphs I suppose I should resume the tutorial.
The last NOVA diamond wheel used for both the stone and metal is the 3000 grit. The 3000 grit metal finish is very close to a mirror metal polish.
Once you go to the polishing stages of 8,000; 14,000 and 50,000 you again hold the knife at an angle so that the metal of the spine is not being touched by the polishing wheels. If these grits of polish hit the metal they leave fine scratches that show. I cannot explain how or why but with over 250 knives of experience I can just note what I have learned.
This picture is taken on the 8,000 grit Diamond pacific wheel. You can see the mirror like finish that is now on the spine. This is the correct angle and pressure on the knife to get the edged polished without marring the finish on the spine.
This is how the spine looks with a 3,000 grit finish. The factory finish on most knives appears to be 600 grit. The nice thing about a 600 grit finish is it looks just fine but does not show handling scratches or high and low spots. The finer the finish the more handling scratches show. Once you get to this stage handling and contamination become big concerns.
This is the finish on the stone after the polishing with the 50,000 diamond sanding belt on the expanding drum.
The Diamond Pacific Genie can be used for polishing with MANY different materials and with different binders. I have pictured cerium oxide and leather as an example. In zip lock bags I have setups for aluminum oxide and diamond paste on leather and poly pads. If one polish does not get good results I try a different one.
Using ZAM metal polish on a soft CLEAN buff wheel gives the best result on turquoise, bone, mammoth ivory and mammoth tooth. Do not use the same buff for metals or you will stain the turquoise, bone mammoth ivory and tooth!
13) CLEANUP AND PREPARATION FOR METAL POLISH –
This is the one part of knife making I just do not enjoy. I use paper towels and older polishing cloths with “Goof Off”. Leave the blade taped.

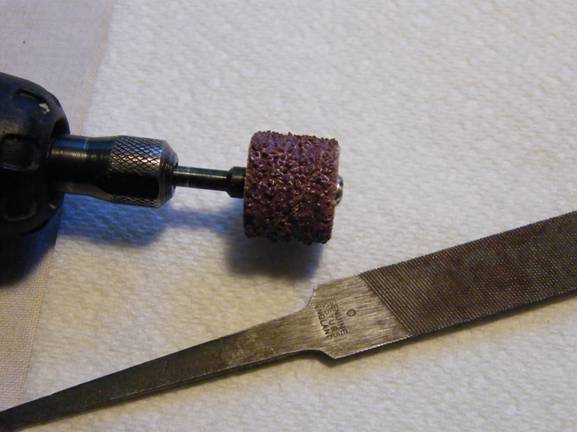
I start with a fine file to remove any burr in the knife well(s) from the liners. These are caused in the sanding stages. I use the file to remove any tape left from covering the holes left by the pins.
Once the burrs are removed I use a green 180 grit Dremel polishing wheel to smooth the edges. You need to hold the Dremel at an angle to keep it from “grabbing” in the well. It is really important to get the front section smooth to keep from scratching or binding the part of the blade that is not sharpened (the tang).
I clean the bolsters next and use one of the plastic epoxy mixing knives to clean and polish the point where the stone and metal bolsters meet. I use liners and backsprings off knives that “died” in my learning process wrapped in goof off coated cloth or paper towel to clean the knife well. A thin file will also work.
You then need to close the knife enough to get the backspring(s) lifted. I use the plastic knife wrapped in an old polishing cloth and goof off to clean the sides of the springs and down the spine to the spine lock on knives that have one. I have a metal pick that I sometimes need to use to pick off glue or other unidentified “gunk”. You need to be VERY careful with the pick or you will be back to the sanding and polishing wheels to get a scratch out.
The last part of the cleanup is taking the tape off the blade. Most of the time the only thing needed is a good cleaning with goof off and a bit of metal polish.
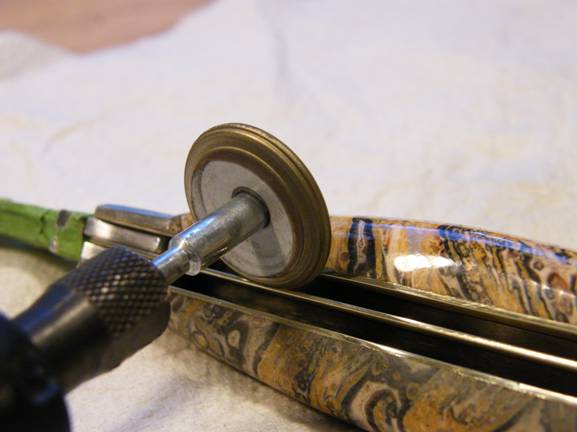
For most bolsters I usually just put a good shiny finish on the bolster using only Tripoli polish. I do the polish with the knife closed and I have a variable speed grinder setup for the polishing. I run it at bout 2/3 of the maximum speed. If you put a mirror polish on the bolsters even rubbing the bolster with a clean soft cotton towel will leave swirls showing easily.
I polish standing sideways and a bit out of the line of travel of the spinning wheel just in case a knife is grabbed by the buffer and thrown. I use two ½ inch cotton buffing wheels together to give me a one inch wide buff. The edges wear first so I flip the worn edge to the middle after about 100 knives to get a new crisp edge and after nearly 300 knives I am getting close to needing new buffs for the Tripoli station. When I buy new ones they will actually go to the ZAM polishing station and that ZAM ones will be moved to the Tripoli station. This way I have the cleanest possible pads for the station I use to polish ivory, bone, and mammoth tooth. The ZAM is less abrasive than Tripoli so it will not affect the finish of the Tripoli.

The stone is taped off to protect it from turning black and the knife is closed. I only polish about 2/3 of the bolster from each side of the buffing wheel so that the top edge of the knife NEVER comes in contact with the buffing wheel. Be certain that only the bottom touches the buffing wheel so that the knife does not get “grabbed”. Be careful to not buff too hard into the contact point where the bolster meets the stone. You should not be cutting through the masking tape. You need to lightly recharge the buffing wheels after about every 30 seconds of buffing. You can see the rounded edges of the buffing wheels in the middle as I have turned them to get the new “crisp” edge.
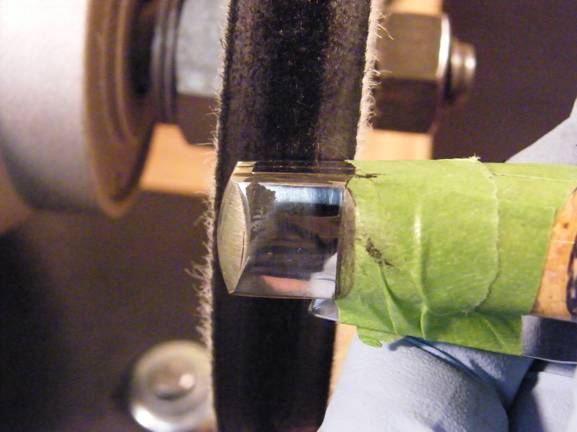
The fine point where the bolster meets the stone is polished on a medium hardness felt wheel on the other side of the Tripoli buffing station. The hard edge of this wheel is lightly run along this contact point and should not wear through the tape or you are using too much pressure. This wheel does not grab but you still need to work with a lot of caution as it is spinning and you have your fingers and body right next to it. This wheel can be reshaped with a block of hard wood and some 60 grit sand paper when the edge gets rounded. I use a flat block of copper with the paper wrapped around it but a hardwood block would also do just fine with a bit more hand pressure.
Once the bolsters are buffed out you need to be only rub them straight across in cleaning them or waxing as the metal is very soft and will show handling swirls and scratches. These happen so easily it drives me to drinking beer, but only when not using the buffer.
If a knife blade gets small scratches during all of the handling and taping it is important to know how to hand polish a blade. Actually most of the scratches were probably on the knife when you started but as the factory finish is not as good as what is now on the spine, suddenly they show up much more. Obviously the blade cannot be taped so extreme care and slow work is required. I use a small block of a 2 x 4 that is about 8 inches long as my support.
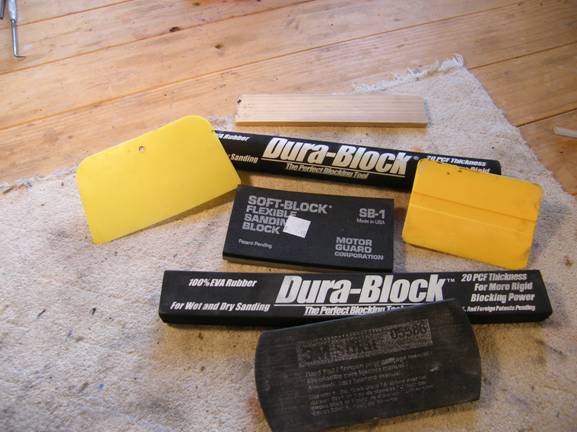
Here are the sanding aids I use and all but the paint stick were bought at an automotive paint store. I start with 1200 grit wet/dry black sand paper. I only sand in one direction and that is from the spine toward the sharpened edge. If you look carefully at most knife blades you will see there are grinding and sanding marks that go in this same direction. If you sand along the length you will spend hours getting all of the new scratches you make out and you will probably need to start at 320 grit.
If the 1200 grit does not eliminate the scratches after a couple of minutes of work I drop back to 600 grit and sand until they are gone. I then spend a couple of minutes with the 1200 grit.
If you started with a polished blade then you cannot sand the blade unless you are willing to spend a few hours going from wet sanding with 1200 grit to wet sanding with 2000 grit and then a medium and fine metal polish.
I use a medium and fine metal polish on all of the blades I work on. I specifically use a product called “Heavy Metal”. I buy it at the local Les Schwaub tire store. It is also available on Ebay and I found it with a search for “heavy metal polish”.
There is a great trick to doing this polishing that also works on metal bolsters to remove swirls and handling scratches. Put a bit of the polish covering an area about 3 inches by 6 inches on a flannel cloth. Put the polishing cloth so that it hangs over the edge of a smooth wood surface such as a work bench or table. Hold the blade flat and drag it through the section with the polish quite a few times on each side of the knife. You should see the cloth turn black from the metal being polished. On some knives that are hollow ground (with a deep concave cut) you may need to put a towel under the polishing cloth to create a “swell” up into the cut.
Do this with both the medium and fine polish and you will be amazed at how easily you can polish a blade or bolsters. The spine should have a great polish but if you manage to get some handling scratches you can use these same polishing methods for the spine. Usually the fine polish is enough to remove any handling scratches.
I finish with a micro fiber polishing towel with just a few drops of the fine polish. You can buy the microfiber polishing towels at any auto supply store as they are used for polishing and waxing cars.
I do a quick cleaning of the knife well to get any Tripoli or metal polish out and then I go to the last step.
The last polishing step is waxing and polishing the knife. I use the flannel to rub the wax on all surfaces of the knife and I use the micro fiber towel to polish the wax off. I use Renaissance wax.
Once I get to this point I take photo’s of the knife. After all of this is finished I put a bit of a top grade oil on the pivot pin and on the moving surfaces of the backspring. I open and close the knife about a dozen tines and then use a different microfiber towel to wipe the knife down.
ADDITIONAL INFORMATION –
15) DOING A BRUSHED FINISH ON THE BOLSTERS
This finish is actually a lot harder to do than a polished finish but you do not need a buffer and it is a lot safer to do. I use a dense foam bar that I bought at an automotive paint store and a hard plastic epoxy mixing “knife” which is also from the automotive paint store. What will work nearly as well is a large paint stick or a wooden yardstick cut to a piece about 6 - 9 inches long.
You need to start with a new 1/2 sheet of the 600 grit wet/dry black sand paper. Use the paper like it was free! Tape off the stone with two layers of masking tape. Wrap the paper as tight as possible around the wood/block. You only sand in one direction and you need to lift as you finish each stroke or you will get weird “hooks’ in the pattern. I put the limit at about 20 strokes before you need to get a new surface for the paper either by turning the piece of wood/block over or getting a new piece of sandpaper.
Try to make only one pass directly at the edge of the stone and bolster. If you cut through the masking tape you will put scratches in the stone and it is impossible to polish them out. You need a new piece of paper and only one layer is wrapped around the block as you need a sharp crisp FOLDED edge. I use the plastic “mixing” knife with a piece of paper about 5 inches to a side for this task.
When you are happy with the 600 grit finish start all over doing the same procedure with 1200 grit. 1200 grit will leave a very nice looking satin finish.
This actually is really simple. I have a flexible but dense block I use for the sanding that I bought at an automotive paint store. I start with 600 grit wet/dry black sand paper. I only sand in one direction and that is from the spine toward the sharpened edge. If you look carefully at most knife blades you will see there are grinding and sanding marks that go in this same direction. If you sand along the length you will spend hours getting all of the new scratches you make out and you will probably need to start at 320 grit.
When the etch is nearly gone switch over to 1200 grit to finish the removal and get the 600 grit marks removed.
If the 1200 grit does not eliminate the etch after a couple of minutes of work I drop back to 600 grit and sand until they are gone. I then spend a few minutes with the 1200 grit.
Next I use a medium and fine metal polish on all of the blades I work on. I specifically use a product called “Heavy Metal”. I buy it at the local Les Schwaub tire store. It is also available on Ebay and I found it with a search for “heavy metal polish”.
There is a great trick to doing this. Put a bit of the polish covering an area about 3 inches by 6 inches on a flannel cloth. Put the polishing cloth so that it hangs over the edge of a smooth wood surface such as a work bench or table. Hold the blade flat and drag it through the section with the polish quite a few times on each side of the knife. On some knives that are hollow ground (with a deep concave cut) you may need to put a towel under the polishing cloth to create a “swell” up into the cut.
You should see the cloth turn black from the metal being polished. Do it with both the medium and fine polish and you will be amazed at how easily you can polish the blade. You should end up with a knife with a better finish than when you started and no etch.
17) WORKING WITH CARBON STEEL AND DAMASCUS –
Carbon steel rusts, pits and discolors quickly when in a water spray and the masking tape will not stop the damage from occurring. It really is best to avoid using any carbon steel blades.
If you really do want to do one you need to coat the blade with lithium grease before taping it. You still cannot let the knife sit wet so you need to take the tape off any time you are between stages of the process and redo the grease and tape when you go to the next stage.
Even with extreme care you still may get a few light marks that usually polish out with the methods noted for using the metal polish on a flannel cloth.
Many of the patterned Damascus steels will mark like carbon steel so if I am not sure that the Damascus is only made with stainless steel’s I treat it like it was a carbon steel blade.
If you have read this far I want to thank you for taking the time and I do hope this tutorial has helped. Please feel free to send me questions or to ask for clarification on any of the information I tried to convey. Comments are really appreciated.