

NOTE: please excuse my poor photography, I tried to take all the pictures myself while working and the lighting isn't the best for taking pictures (obviously)
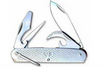
First you need a donor knife; this is a case hawkbill that was sent to me for some embellishment from a fellow forum member.

First thing you need to do is tape the blade up to save it and your fingers from possible damage.
After that is taken care of you need to remove the heads of the butt and rocker pins. I use a dremel for this.
This is the handiest bit you can have:

If you plan to reuse or save the scales, be very careful not to slip off the pin and damage the scales, if you don't plan to use them over it won't hurt if you bugger them.

This is one of my most frequently used tools; it is a drill press vice. I have covered half of the jaws top and inside with 4 layers of duct tape, this prevents you from marring the bolsters and/or liners. Someday I'll get around to permanently attaching leather covers on it to replace the duct tape. This vice does about anything I need done, I use it as a surface for peening, knocking out pins, compressing springs, clamping handles, cutlering blades ect.

Now, using your vice as a base (a block of wood with a hole drilled in it works good too) use your punch to knock out the two pins.


Once those two pins are gone, the back spring will fall out.

I have mentioned my favorite punch before, it is just a modified Phillips screwdriver, tapered down to 1/16" at the point, but it thicker up farther for strength, I can knock out pin up to 5/32" with this homemade punch. I am convinced that it will not break.

Once those pins and the back spring is out, then it's time to shear the pivot pin. This is a new knife I made from an Eko slicer for shearing pins; I used it today to see if it was going to hold up.

Like I said, it doesn’t have to be anything fancy, as long as it gets the job done.
I start on the underside of the knife with the blade open I find which side has the biggest gap, and then I work the tip of the blade in there and give it a couple taps with the hammer to loosen things up.

Then I turn it up on top of it's bolsters with the blade in the half open position, insert the blade in the now fairly large gap, and hammer it through the pin.

Now it's broken down into its main components:

As you can see, my Eko didn't "cut it" I thinned the edge too much, will have to fix that tomorrow.

Once that is done, it's time to get rid of the pin stubs sticking from the bolsters. It is important that you lay the bolster lengthwise with the opening in the vice and not across it, by laying it lengthwise it doesn’t allow the weld between the liners and bolster to bust loose from pressure, this keeps everything in one piece! Now, just take the punch and knock out the pins.


Now, here is where most repairmen/restorers would stop and clean all of the parts, replace broken ones and reassemble it. But since this is going further than just a repair I continue to break it down.
In this picture you'll see the inside of the liners and the flanged ends of the scale pins. If you wish to remove the scales, use the dremel to remove the flanged part, then if the scales are not glued on (like this case) they will just fall off.

Once the scales are removed this is what you'll see:

Now, from here on out until the reassembly this turns into an embellishment tutorial
Now it's time to pick out a new set of scales, the client wanted maple burl, so that is what he shall get.
Now, it is important to "read" the wood (if that is the handle material you are using) look for checks, cracks, knotholes, and the like. Also, look at the thickness of the stock, and the actual thickness you will need. Here is the set of maple burl scales:

But each scale is nearly 1/2" thick

Over twice the thickness I actually need. So, I made plans to rip it in half and book match the scales.
Set up the rip fence throw on some safety glasses and fire up the band saw:

A push stick was used, so I still have all ten fingers
This was the result, a nice set of highly figured book matched maple burl scales

Now, I use the table on the band saw as a flat surface and use 100 grit sandpaper to flat sand one side on each piece of maple.

Remember what I said about reading the wood? This was the cross section of one of the slabs; it was cut crooked from the supplier, so I had to bypass that part.

Now, I find the best group of figure and trace out where the handles should lay, a well sharpened pencil works best, as a pen will bleed into the wood and may or may not sand out (I know from experience

I then make sure the ends of the slabs are true where they will meet up properly with the bolsters, for the record-they were not true and I had to hand file them to match up right.

Then take your trusty dremel and rough the liners up real good with a stone or sanding drum, this will ensure a good gripping surface

Now it's time to prepare everything, thoroughly degrease the liners and end of the bolsters with acetone or alcohol.

If your shop is an ice zone like mine is, keep your adhesives indoors at room temperature, this keeps the chemicals at ease and they will mix and bond better. I also recommend you taking the liners and slabs inside after the glue is applied so they can dry at room temperature for a strong bond.
You don't have to mix a lot of epoxy, I buy Devcon 5 minute epoxy in the large bulk tubes, saves me a few trips to Lowes. It only takes a bit to entirely cover the liner with a thin coat. Just remember, too much is better than too little. You can always grind off some ooze after it dries, but if you don't have enough to hold the bond, then you'll have to do it over.
Then just clamp them in C clamps with moderate pressure. Be sure to check to make sure the end of the wood is flush with the bolster and not canted and that everything lines up in the outline you made earlier.
Now, while the handles are setting up inside, it's time to do any other work to the blade and/or springs that may need done. In this case, he wanted some filework on the spring. I mark out my intervals with a fine tip sharpie first

Then I chuck it up in a bench vise so I have to stand while doing the filing. I don’t file good when sitting down :shrug::
Here is a quick shot of the progress on the spring

Now, all of that as done, I let the 5 minute sit for at least 3 hours before touching it again to ensure that it has a good bond before I start working on it again. In the extra two hours I completed another project I had going and examined a puma game warden that had been shot with a .44 pistol that was sent in for repair (my first gunshot victim!
By now the handles are dry so I take them from the clamps and this is what I have:

The first thing I do is rough them out with the band saw, be very careful not to hit the liner with the saw blade, not only will it cut your liner it will most likely ruin the blade too.

Then I use a 50 grit belt on the belt sander to rough them in even closer. (I would have gotten more pictures of these processes, but it's hard to keep control over what your doing and work a camera at the same time!)


Now on to a 220 belt to true things up even further

From here on out its all hand work, so you don' disfigure the liners or handle with power tools.
Once you have each side fitted to the liners it's time to drill the pin holes. I use the exisiting pin holes in the liners ,and drill through them.
First I'll drill the 1/16" fore pin hole in each scale

Then I'll drill the 3/32 butt and rocker holes in each scale

A brass lined lanyard hole was also requested, so I ream the old hole out to accept my tubing, then some rough filing with the double cuts to get a rough bevel and fit the scales close to the bolsters

Then I finish fitting and beveling and sand with first 150 grit and then 240 grit wood papers.

Maple being maple, the grain has a tendency to rise, so I eliminate the chances of this by raising the grain up to 4 times with 30-45 min dry period and 220 sanding in between each time.
I string them up on a piece of pin stock and let them dry thoroughly before sanding and wetting again.

Here is a sneak peek at what the figure may look like


It started to get real cold out in the shop toward dusk, so I called it quits for the night and will continue this tomorrow.
Just a few tips until then- When working the handles down be sure to keep a solid surface beneath the liner so the bond isn’t stressed and the handles won't pop off. Also, use masking tape to tape the bolsters off if you like, I usually don't bother unless it is a light colored wood, where the metal dust will enter the grain of the wood and turn it black, maple for example is one of these woods. This project would have been done today, but when pinning the handles, it is a longer more drawn out process, but I enjoy it. Questions and comments are more than welcome.