A few projects

This forum is for those who like to repair and restore knives, and for those who would like to learn.
Post Reply
User avatar
glennbad
Gold Tier
Gold Tier
Posts: 8174
Joined: Mon May 15, 2006 11:13 am
Location: NH

A few projects

Post by glennbad »

I, like many others here, like to tinker with old knives. While my skills are not up to many of the fine mechanics on this site, I certainly get a lot of enjoyment out of it. Here are a few projects I have recently finished:

Here is an Imperial scout whittler, which was pretty eaten up inside.

Image
Image

I didn't really take any pictures during the work. I ended up using some composite plastic-type scale material. I was not happy with the finished product, and feel I rushed it a bit. Also, I did not do too much to the blades, as they were pretty pitted. I just cleaned them up some. All in all, it will make a good user.

Image
Image


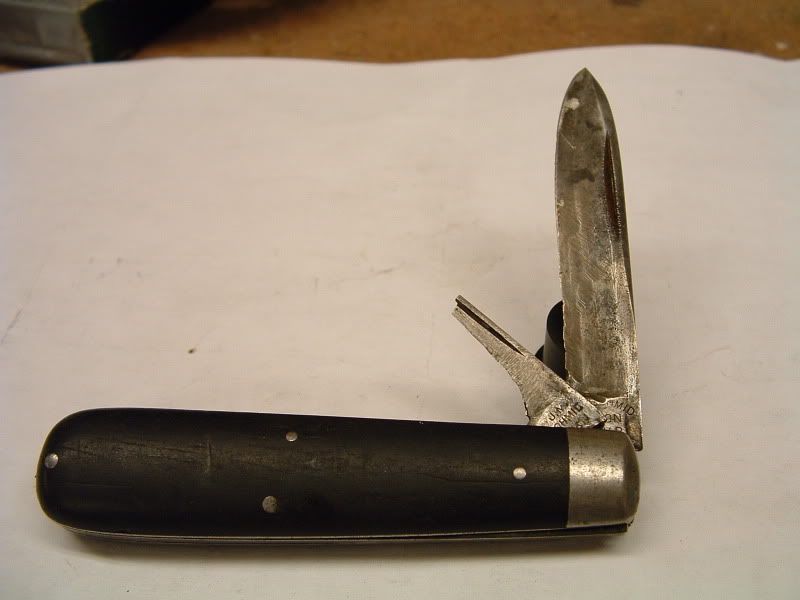
This next one was cool. It was made by J.M. Schmid & son, of Providence, RI. As you can see, the second blade was beyond used up. I decided to make it into a single blade knife.
Image

The wood, which is Ebony, I believe, was kinda dry and brittle, and did crack some during the process. I decided to try and keep it, and glued it back in. I also put a small EO notch in it as well. The knife is small, all of about 2 1/2", and slim. It will ride well in the pocket.

Image
Image

Last one to follow...

Glenn
User avatar
glennbad
Gold Tier
Gold Tier
Posts: 8174
Joined: Mon May 15, 2006 11:13 am
Location: NH

Re: A few projects

Post by glennbad »

This last one I really enjoyed. As you can see, it was pretty eaten up inside as well, missing the bail, with shrinking scales.

Image
Image
Image

Unfortunately, I forgot to take pictures along the way till the end. This was my first redo with this many blades, so it was a bit of the challenge. I picked some Culpepper bone called Autumn Gold. Nice color...here it is before the final shaping and polishing.

Image


And here is the finished product. I found a decent bail to use on it. Again, I did not do too much to the blades other than a light sand and some cleanup.

Image
Image

I was pleasantly surprised that things went back together well, and the blades all have good snap. I like this one alot.


Thanks for looking.

Glenn
User avatar
orvet
Gold Tier
Gold Tier
Posts: 19901
Joined: Tue May 16, 2006 6:23 am
Location: Willamette Valley, Oregon

Re: A few projects

Post by orvet »

Nice work Glen! ::tu::
I like the Scout, what is the handle material?
Dale
AAPK Administrator

Please visit my AAPK store: www.allaboutpocketknives.com/orvet

Job 13:15

"Buy more ammo!" - Johnnie Fain
“Evil is Powerless If The Good are Unafraid.” – Ronald Reagan
User avatar
glennbad
Gold Tier
Gold Tier
Posts: 8174
Joined: Mon May 15, 2006 11:13 am
Location: NH

Re: A few projects

Post by glennbad »

The Imperial scout whittler is Fantasy marble from Jantz.

The Colonial scout is Autumn Gold bone from Culpeppper.

Glenn
User avatar
singin46
Posts: 8126
Joined: Thu Feb 08, 2007 6:57 am
Location: MUSIC CITY

Re: A few projects

Post by singin46 »

Very Nice Work!! Glen I really like the last one. ::nod:: ::tu:: ::tu::
Love all Jacks
User avatar
zed6309
Bronze Tier
Bronze Tier
Posts: 3135
Joined: Fri Mar 04, 2011 8:07 am
Location: poole,dorset,uk

Re: A few projects

Post by zed6309 »

nice work mate, the scout looks great ::tu::
Paul,

friendship is a rare and precious gift,
A day without a pocket knife is the day your need it,
User avatar
philco
Gold Tier
Gold Tier
Posts: 15543
Joined: Sat Mar 22, 2008 9:32 pm
Location: Kentucky (Wildcat Country)

Re: A few projects

Post by philco »

Very nice work Glenn. I liked em all but that three blade scout whittler stood out for me. Those handles were such a radical change from the original that it just sorta clicked for me. I like it ! ::tu::

Phil
Phil
AAPK Administrator

Jesus died for you. Are you living for Him?

"Buy More Ammo!"
Johnnie Fain 1949-2009
knives-are-quiet

Re: A few projects

Post by knives-are-quiet »

glennbad wrote:This last one I really enjoyed. As you can see, it was pretty eaten up inside as well, missing the bail, with shrinking scales.

Image
Image
Image

Unfortunately, I forgot to take pictures along the way till the end. This was my first redo with this many blades, so it was a bit of the challenge. I picked some Culpepper bone called Autumn Gold. Nice color...here it is before the final shaping and polishing.

Image


And here is the finished product. I found a decent bail to use on it. Again, I did not do too much to the blades other than a light sand and some cleanup.

Image
Image

I was pleasantly surprised that things went back together well, and the blades all have good snap. I like this one alot.


Thanks for looking.

Glenn
I got your PM message Glenn~
I don't know how I missed this post?
Thanks for reminding me.
Wow!
All three knives look great~ nice work.
Your skills are just fine.
The more you work on knives the better you will get.
You got the knives back together operating properly and safely, as good as anyone else here.
The finish work is where practice makes perfect.
What type of equipment do you use for finishing up your knives?
Maybe we can help you tweak up that green handled knife you say you are not satisfied with the finished product. With some quick tips and tricks.
If your not satisfied then the knife is not finished...
What aren't you satisfied with?
Let us know Glenn...
And don't be afraid to ask...
That is what we are here for.

J W

PS> I like the mini easy open jack with the ebony handles.
Good call making it a single blade.
User avatar
glennbad
Gold Tier
Gold Tier
Posts: 8174
Joined: Mon May 15, 2006 11:13 am
Location: NH

Re: A few projects

Post by glennbad »

glennbad wrote:I didn't really take any pictures during the work. I ended up using some composite plastic-type scale material. I was not happy with the finished product, and feel I rushed it a bit. Also, I did not do too much to the blades, as they were pretty pitted. I just cleaned them up some. All in all, it will make a good user.

Image
Image

Glenn
Well, since you asked how I thought I rushed this one, for one, the pivot pins did not get finished properly, They were not peened well, and sit proud of the bolsters with gaps around the edges. The 2 pins on the scales that hold the scales in place were cut short, and I did not want to peen them too hard, as I did not want to crack the material. Additionally, although I didn't want to, I should have sanded the blades down more to get rid of more of the pitting. It would have made for a better looking end product.

Other than that, I'm happy with the knife. ::undecided::

Glenn
knives-are-quiet

Re: A few projects

Post by knives-are-quiet »

glennbad wrote:
glennbad wrote:I didn't really take any pictures during the work. I ended up using some composite plastic-type scale material. I was not happy with the finished product, and feel I rushed it a bit. Also, I did not do too much to the blades, as they were pretty pitted. I just cleaned them up some. All in all, it will make a good user.

Image
Image

Glenn
Well, since you asked how I thought I rushed this one, for one, the pivot pins did not get finished properly, They were not peened well, and sit proud of the bolsters with gaps around the edges. The 2 pins on the scales that hold the scales in place were cut short, and I did not want to peen them too hard, as I did not want to crack the material. Additionally, although I didn't want to, I should have sanded the blades down more to get rid of more of the pitting. It would have made for a better looking end product.

Other than that, I'm happy with the knife. ::undecided::

Glenn
Yea, rushing it can be a problem.
I used to be the same way.
Very inpatient and excited to just get a knife done that I would forget or overlook doing certain things. That’s how we learn, by making these mistakes.
Now, I take my time and do a little each day.
It gives you time to think out the next step in the project so you get it right the first time.
Take your time Glenn. The knife isn’t going anywhere and it will be there tomorrow.
That Imperial whittler doesn’t look that bad and the minor problems you have with the finished product can be fixed.
As for the blades. They are fine the way they are.
You made the right call not trying to get all that pitting out.
When a knife is that pitted your better off just cleaning and stabilizing the metal and letting the knife show it’s age. Also the blades look to me to almost be full with little percent gone on the edges. If you tried to smooth everything you would make the blades so thin and lose some of the edge. Also you run the risk of losing the blades tempering by all the heat created in the process and make the knife unusable and unable to take or keep a sharp edge.

The problem you have with your pinning can be fixed with a knife or belt sander.
Or just leave them. Some old knives bolster pins show. That's just the way they were.
If your handle material is secure I would leave the pins on the handles just the way they are. They look fine.
As long as you used the same metal as the bolsters, you can make those prouded bolster pins disappear.
Use a spreader tool to give enough space to get a slacker tool or shim material between the bolster and blade. Give the pivot/bolster pins a few more gentle taps to spread out the exposed part of the pins to fill in the holes better. Then use a knife or belt sander with 400 to 600 grit paper and sand out the pins.
Rotate the knife as your sanding to keep the shape of the bolsters.
If you do everything right you shouldn’t see the pivot pins at all.
After you can’t see the pins anymore then you can use a buffing wheel to give a mirror polish to the bolsters or leave them as is for a matte finish.

When I first started out I found that using wood for handle material helps you learn shaping techniques without spending a lot of cash. You can find some good wood to use in your own back yard.
Also wood is a little more forgiving than bone or plastics plus with most of these old knives you can keep that antique or vintage look with using wood. A lot of making the finished product look good is in the design. Keeping the vintage knife to it’s period look. Using composite material on a mid 19th century knife just would not look right. Wood can be used on any knife ancient or brand new.


Here is another I recently converted.
A Saynor Cooke and Ridal Swayback from the mid 1800’s.
The knife used to have plain smooth ruff bone handles and a sheep’s foot blade.
The bone was broke and brittle on both sides and more than 25 % of the blade was gone.
So I added black & white ebony wood handles (way cheaper than bone).
I shaped what was left of the blade into a wharencliffe.
I slowly worked on the blade removing some minor pitting and a lot of stains.
I now have a mid 19th century swayback jack with wharencliffe blade that still shows a little of it’s age but keeping to the time period made.
I spent less than 10 bucks converting this knife.

"SORRY ONLY ONE BEFORE PICTURE"
Image
"AFTER PICTURES"
(I left the pivot pins show but since these pictures were taken I sanded and buffed the bolsters to where you can't see them anymore. " I'll post pictures later")

Image
Image
Image

With a little studying of the knife your working on and taking your time you will get much better at it. Just ask questions and others opinions on this site to help you out on future rebuilds.

J W
User avatar
glennbad
Gold Tier
Gold Tier
Posts: 8174
Joined: Mon May 15, 2006 11:13 am
Location: NH

Re: A few projects

Post by glennbad »

Thanks for the advice!

Glenn
knives-are-quiet

Re: A few projects

Post by knives-are-quiet »

glennbad wrote:Thanks for the advice!

Glenn
Your welcome Glenn.......

Here are a few pictures of this Saynor knife after sanding out the pivot pin.
Image
Image

J W
User avatar
muskrat man
Gold Tier
Gold Tier
Posts: 5684
Joined: Fri Jun 30, 2006 4:04 am
Location: Ohio
Contact:

Re: A few projects

Post by muskrat man »

Nice job Glenn! I especially like the whittler handles. It almost looks like some of the old swirl celluloid you see on some of the old new york area knives. What color was that synthetic labeled as? I have tried some of the "black cherry" it looks similar only it is different shades of a dark red. I know it's a PITA to pin it without cracking it. Very brittle stuff. A shame it isn't more flexible like celluloid.
Custom knives, repair, restoration & embellishment
Certified Hubertus, Taylor, & Schrade repairman past and present
http://www.muskratmanknives.com
https://www.facebook.com/Muskratmanknives
User avatar
glennbad
Gold Tier
Gold Tier
Posts: 8174
Joined: Mon May 15, 2006 11:13 am
Location: NH

Re: A few projects

Post by glennbad »

muskrat man wrote:Nice job Glenn! I especially like the whittler handles. It almost looks like some of the old swirl celluloid you see on some of the old new york area knives. What color was that synthetic labeled as? I have tried some of the "black cherry" it looks similar only it is different shades of a dark red. I know it's a PITA to pin it without cracking it. Very brittle stuff. A shame it isn't more flexible like celluloid.
That was called "Sea Glass", from Jantz.

Glenn
Post Reply

Return to “Knife Repair and Restoration”