Giving knife repair a try.

This forum is for those who like to repair and restore knives, and for those who would like to learn.
Post Reply
User avatar
Nev52
Posts: 1243
Joined: Thu Sep 14, 2017 12:37 am
Location: Pennsylvania

Re: Giving knife repair a try.

Post by Nev52 »

dlr110 wrote: Thu Jan 06, 2022 3:09 am It looks like you did very well. On that kit I had a hard time getting a good snap on the blades. How is yours?
David,
My knife at first did not have good snap.On the numerous times I had it apart I put more arc in the spring. I also did that on the second knife before I put it together. It has good walk and talk now.

Nev 52

User avatar
dlr110
Gold Tier
Gold Tier
Posts: 6454
Joined: Sat Nov 05, 2016 4:24 am
Location: Ponder, Texas

Re: Giving knife repair a try.

Post by dlr110 »

Nev52 wrote: Thu Jan 06, 2022 2:05 pm
dlr110 wrote: Thu Jan 06, 2022 3:09 am It looks like you did very well. On that kit I had a hard time getting a good snap on the blades. How is yours?
David,
My knife at first did not have good snap.On the numerous times I had it apart I put more arc in the spring. I also did that on the second knife before I put it together. It has good walk and talk now.

Nev 52

Very good! ::tu::
David Roberts
U.S. Navy and D/FW International Airport Board Retired
Prayer Changes Everything
User avatar
Nev52
Posts: 1243
Joined: Thu Sep 14, 2017 12:37 am
Location: Pennsylvania

Re: Giving knife repair a try.

Post by Nev52 »

glennbad wrote: Thu Jan 06, 2022 2:19 am You may also be starting with too much pin prior to peening. You also don't need to flatten that pin all the way flush with the cover material. It's okay to have a prominent head and file/sand down the extra.
Glen,
One more question. When you peen scales do you peen the out side first or the inside. I was thinking down the road if I ever try bone should I peen the inside then finish with the outside? ::hmm::

Thanks Nev 52
Reverand
Gold Tier
Gold Tier
Posts: 4461
Joined: Mon Oct 22, 2018 6:45 pm
Location: Pisgah, AL
Contact:

Re: Giving knife repair a try.

Post by Reverand »

Nev52 wrote: Fri Jan 07, 2022 12:25 am
glennbad wrote: Thu Jan 06, 2022 2:19 am You may also be starting with too much pin prior to peening. You also don't need to flatten that pin all the way flush with the cover material. It's okay to have a prominent head and file/sand down the extra.
Glen,
One more question. When you peen scales do you peen the out side first or the inside. I was thinking down the road if I ever try bone should I peen the inside then finish with the outside? ::hmm::

Thanks Nev 52
I have done both. For handle pins, I will sometimes clamp the pin in a vise and peen a head on it. I split the other side of the pin slightly with a tiny file. Then I insert the pin, set the split side against the anvil, and tap the head of the pin slightly. That spreads the split enough to hold it tightly, then I sand that inside part flat. I normally glue my handles first, but make sure the pins are secure anyway. Kinda like wearing both a belt and suspenders!
Jesus is life.
Everything else is just a hobby.

~Reverand
User avatar
glennbad
Gold Tier
Gold Tier
Posts: 8173
Joined: Mon May 15, 2006 11:13 am
Location: NH

Re: Giving knife repair a try.

Post by glennbad »

I also do both, but it depends more on the material than anything else. With micarta or softer woods, you can work on the pin pretty good, as the material is tougher. For bone and harder woods, you have to have a gentler touch. I would tend to dome those pins more than trying to flatten them.
User avatar
Nev52
Posts: 1243
Joined: Thu Sep 14, 2017 12:37 am
Location: Pennsylvania

Re: Giving knife repair a try.

Post by Nev52 »

Thank you both for your insight on this. ::handshake:: I will give that method a try.

Nev 52
User avatar
Nev52
Posts: 1243
Joined: Thu Sep 14, 2017 12:37 am
Location: Pennsylvania

Re: Giving knife repair a try.

Post by Nev52 »

Jeffinn wrote: Thu Jan 06, 2022 2:27 am
glennbad wrote: Thu Jan 06, 2022 2:19 am You may also be starting with too much pin prior to peening. You also don't need to flatten that pin all the way flush with the cover material. It's okay to have a prominent head and file/sand down the extra.
This^
Start with less pin protruding. And peen the head much less. You only need enough of a peen to prevent the pin from pulling out. It’s a lot less peening than you would think. And as Glenn said you can always sand/file the pin flush afterwards.
Oh, and the knives you did look great! ::tu::
Jeff
Jeff,
I tried the advice Glen and you offeredon my 3rd build. I liked the oak look so I made my own scales again. This time the pins look better and the bolster pins are almost hidden. Here are some pictures.
oak scale trapper l.jpg
Oak scale trapper r.jpg
User avatar
dlr110
Gold Tier
Gold Tier
Posts: 6454
Joined: Sat Nov 05, 2016 4:24 am
Location: Ponder, Texas

Re: Giving knife repair a try.

Post by dlr110 »

You're doing great, now let's try a lockback kit.
Here is one that I did.
20210106_100043.jpg
David Roberts
U.S. Navy and D/FW International Airport Board Retired
Prayer Changes Everything
User avatar
Nev52
Posts: 1243
Joined: Thu Sep 14, 2017 12:37 am
Location: Pennsylvania

Re: Giving knife repair a try.

Post by Nev52 »

Very Nice!! Great Job ::tu:: I Like the way your pins look. I will have to try one.
User avatar
Jeffinn
Posts: 2091
Joined: Fri Nov 10, 2017 3:16 am
Location: Roseville, Mi
Contact:

Re: Giving knife repair a try.

Post by Jeffinn »

Nev52 wrote: Fri Jan 07, 2022 8:51 pm
Jeffinn wrote: Thu Jan 06, 2022 2:27 am
glennbad wrote: Thu Jan 06, 2022 2:19 am You may also be starting with too much pin prior to peening. You also don't need to flatten that pin all the way flush with the cover material. It's okay to have a prominent head and file/sand down the extra.
This^
Start with less pin protruding. And peen the head much less. You only need enough of a peen to prevent the pin from pulling out. It’s a lot less peening than you would think. And as Glenn said you can always sand/file the pin flush afterwards.
Oh, and the knives you did look great! ::tu::
Jeff
Jeff,
I tried the advice Glen and you offeredon my 3rd build. I liked the oak look so I made my own scales again. This time the pins look better and the bolster pins are almost hidden. Here are some pictures.oak scale trapper l.jpg
Oak scale trapper r.jpg
Looking good!
The more you do them the better you’ll be at it. Nice job on the hand made scales.
Jeff
Hey … it’s a pocketknife for gosh sakes. I’m not selling the Mona Lisa….Bullitt4001
https://www.jfinamoreknives.com
http://www.secondlifeknives.com
Reverand
Gold Tier
Gold Tier
Posts: 4461
Joined: Mon Oct 22, 2018 6:45 pm
Location: Pisgah, AL
Contact:

Re: Giving knife repair a try.

Post by Reverand »

That does look good!
And I agree that oak is a good choice. Very classy!
Jesus is life.
Everything else is just a hobby.

~Reverand
User avatar
Nev52
Posts: 1243
Joined: Thu Sep 14, 2017 12:37 am
Location: Pennsylvania

Re: Giving knife repair a try.

Post by Nev52 »

Thank you both for your encouragement. ::handshake::
I am enjoying working on the knife kits but I like the challenge of making my own scales for the knives. I still have along way to go but with the tutoring of the people on this site I think I have a new hobby to keep me busy. :D

Thank you all for your help on this. ::handshake::

Nev -52
User avatar
Nev52
Posts: 1243
Joined: Thu Sep 14, 2017 12:37 am
Location: Pennsylvania

Re: Giving knife repair a try.

Post by Nev52 »

My 1st actual repairof a knife. I saw a friend over the weekend and showed him the knife kit I put together. He told me he had a knife that fell into the engine compartment of a vehicle he was working on and was going to throw out. I told him I would like to try to repair it. I started to look it over and found that not only were the scales broken the coping blade had no snap. I disassembled the knife and bent the backspring on the coping blade. Then I replaced the scales with some micarta I purchased from Jantz supply. I am gradually learning with the help of the members on this forum. ::tu::
I also have a picture of a rough ryder lockback kit I just did with white micarta scales. It appears white miarta absorbs you grimy finger prints. Maybe I should have sealed the scales before working on them. ::dang::

Just wanted to share with everybody.

Regards
Nev 52
broken rough ryder.jpg
rescaled knives.jpg
User avatar
Madmarco
Gold Tier
Gold Tier
Posts: 12039
Joined: Wed May 20, 2020 12:09 am
Location: Smack dab in the middle of Canada

Re: Giving knife repair a try.

Post by Madmarco »

Nev52 wrote: Mon Jan 10, 2022 4:58 pm My 1st actual repairof a knife. I saw a friend over the weekend and showed him the knife kit I put together. He told me he had a knife that fell into the engine compartment of a vehicle he was working on and was going to throw out. I told him I would like to try to repair it. I started to look it over and found that not only were the scales broken the coping blade had no snap. I disassembled the knife and bent the backspring on the coping blade. Then I replaced the scales with some micarta I purchased from Jantz supply. I am gradually learning with the help of the members on this forum. ::tu::
I also have a picture of a rough ryder lockback kit I just did with white micarta scales. It appears white miarta absorbs you grimy finger prints. Maybe I should have sealed the scales before working on them. ::dang::

Just wanted to share with everybody.

Regards
Nev 52

broken rough ryder.jpgrescaled knives.jpg
Great work Nev! ::tu:: Your friend now has his knife back in perfect condition and it should last him a lifetime. Your new kit knife also looks very good. I think the smudged white micarta gives the covers a kindda bone appearance rather than micarta. For future reference, if you apply and then wipe off your micarta pieces with Ren/Walker wax before working with it the fingerprints will be at a minimum if any at all. Nice job, keep up the good work! 8)
8)
User avatar
Nev52
Posts: 1243
Joined: Thu Sep 14, 2017 12:37 am
Location: Pennsylvania

Re: Giving knife repair a try.

Post by Nev52 »

Thank's Marco,
I will try your advice with the Ren/Walker. ::tu::

Nev
Reverand
Gold Tier
Gold Tier
Posts: 4461
Joined: Mon Oct 22, 2018 6:45 pm
Location: Pisgah, AL
Contact:

Re: Giving knife repair a try.

Post by Reverand »

Looks good! And that micarta should be much more durable, and last him a lifetime!
Jesus is life.
Everything else is just a hobby.

~Reverand
User avatar
Nev52
Posts: 1243
Joined: Thu Sep 14, 2017 12:37 am
Location: Pennsylvania

Re: Giving knife repair a try.

Post by Nev52 »

I decided to add some flash to the single blade trapper I built. I dissembled the knife and filed the back spring. Not really the look I had anticipated but the knife still works. :oops:
filed back spring.jpg
trapper filed back spring.jpg
User avatar
Madmarco
Gold Tier
Gold Tier
Posts: 12039
Joined: Wed May 20, 2020 12:09 am
Location: Smack dab in the middle of Canada

Re: Giving knife repair a try.

Post by Madmarco »

Nev52 wrote: Thu Jan 13, 2022 1:30 pm I decided to add some flash to the single blade trapper I built. I dissembled the knife and filed the back spring. Not really the look I had anticipated but the knife still works. :oops:

filed back spring.jpg

trapper filed back spring.jpg
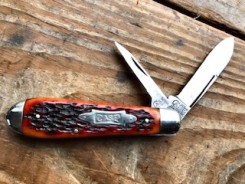
Looks excellent for your 1st try Nev! ::tu:: Wow, if you keep this up we're gonna be treated to some very cool builds, I can hardly wait! ::ds:: With each kit/knife that you assemble/build you will spot previous mistakes and not make them again, as well as coming up with new ideas for designs and features. Thanks for sharing your work with us! ::handshake:: 8)
8)
User avatar
herbva
Gold Tier
Gold Tier
Posts: 2074
Joined: Thu Oct 11, 2018 7:18 pm
Location: The Old Dominion

Re: Giving knife repair a try.

Post by herbva »

Hi Nev. I use a 7mm slackener (feeler gauge) on one side and an 8mm on the other side for most 2-blade knives. That way, I can do all the peening I want, the pin heads will be expanded in the bolster as much as possible, and the blades won't be too tight. Then after I remove the slackeners, there is always just a small amount of blade wobble. Just a tiny tap or 2 without the slackeners in place should remove any wobble. If not, repeat until wobble is gone. Go slow, and don't overtighten. I use modified feeler gauges, so that I can slide them all the way in between the tang and the liner (pic attached). I use tin snips to make these and cheap feeler gauges. For larger knives, I use larger slackeners, but the same process. Sometimes, you do your best, but unexpectedly, the pin heads still show in the bolsters. Just before I assemble everything, I always ream the pin holes in the bolsters so that they are properly tapered and have clean, fresh metal exposed and I lightly sand the pin stock so that you have clean metal on clean metal. Maybe this makes a difference and maybe it doesn't. Just something that someone shared with me a long time ago. :D
Attachments
DSCN9180.JPG
"Better to do something imperfectly, than to do nothing flawlessly." ~ Robert H. Schuller

Herb
User avatar
Nev52
Posts: 1243
Joined: Thu Sep 14, 2017 12:37 am
Location: Pennsylvania

Re: Giving knife repair a try.

Post by Nev52 »

herbva wrote: Thu Jan 13, 2022 10:55 pm Hi Nev. I use a 7mm slackener (feeler gauge) on one side and an 8mm on the other side for most 2-blade knives. That way, I can do all the peening I want, the pin heads will be expanded in the bolster as much as possible, and the blades won't be too tight. Then after I remove the slackeners, there is always just a small amount of blade wobble. Just a tiny tap or 2 without the slackeners in place should remove any wobble. If not, repeat until wobble is gone. Go slow, and don't overtighten. I use modified feeler gauges, so that I can slide them all the way in between the tang and the liner (pic attached). I use tin snips to make these and cheap feeler gauges. For larger knives, I use larger slackeners, but the same process. Sometimes, you do your best, but unexpectedly, the pin heads still show in the bolsters. Just before I assemble everything, I always ream the pin holes in the bolsters so that they are properly tapered and have clean, fresh metal exposed and I lightly sand the pin stock so that you have clean metal on clean metal. Maybe this makes a difference and maybe it doesn't. Just something that someone shared with me a long time ago. :D
Herbva,
Thank's for the advice.

Nev
User avatar
Nev52
Posts: 1243
Joined: Thu Sep 14, 2017 12:37 am
Location: Pennsylvania

Re: Giving knife repair a try.

Post by Nev52 »

Marco,
Thank's for the compliment. ::handshake::
User avatar
Nev52
Posts: 1243
Joined: Thu Sep 14, 2017 12:37 am
Location: Pennsylvania

Re: Giving knife repair a try.

Post by Nev52 »

My last build for now I am out of kits.
I made one more single blade trapper. I think my pinning is starting to improve. I have one issue that I don't like on this build. The blade is not centered. ::dang:: Other than that I think it looks ok.
purple trapper.jpg
top purple trapper.jpg
Reverand
Gold Tier
Gold Tier
Posts: 4461
Joined: Mon Oct 22, 2018 6:45 pm
Location: Pisgah, AL
Contact:

Re: Giving knife repair a try.

Post by Reverand »

I like the handles on this one, Nev52. Your skills are definitely improving.
The blade being off-center can be caused by the holes in the liners not lined up properly, either drilled in the wrong place, pins too small, or a pin is bent. (There may be more, but these are all things that I have done!). Everything should be drilled and sized correctly on a kit knife, but still can be off.
I HATE taking one apart that I have just finished, but I do learn from my mistakes when I do.

I look forward to seeing more of your work when you can!
Jesus is life.
Everything else is just a hobby.

~Reverand
User avatar
Nev52
Posts: 1243
Joined: Thu Sep 14, 2017 12:37 am
Location: Pennsylvania

Re: Giving knife repair a try.

Post by Nev52 »

Reverand wrote: Fri Jan 14, 2022 1:54 am I like the handles on this one, Nev52. Your skills are definitely improving.
The blade being off-center can be caused by the holes in the liners not lined up properly, either drilled in the wrong place, pins too small, or a pin is bent. (There may be more, but these are all things that I have done!). Everything should be drilled and sized correctly on a kit knife, but still can be off.
I HATE taking one apart that I have just finished, but I do learn from my mistakes when I do.

I look forward to seeing more of your work when you can!
Thank's Reverand,
I am enjoying knife repair. One more hobby to keep me busy. I will look into the items you described. Thanks for your help on this issue. ::handshake::

Regards
Nev
User avatar
Nev52
Posts: 1243
Joined: Thu Sep 14, 2017 12:37 am
Location: Pennsylvania

Re: Giving knife repair a try.

Post by Nev52 »

Just rescaled this little whittler. Still not up to the mark with the work I have seen others do on this forum. But I am trying. Small steps at a time.
rescaled whittler.jpg


Nev -52
Post Reply

Return to “Knife Repair and Restoration”