Page 1 of 1
Experimental vacuum chamber
Posted: Tue Sep 17, 2019 4:49 pm
by OLDE CUTLER
Re: Experimental vacuum chamber
Posted: Tue Sep 17, 2019 5:13 pm
by doglegg
OC, a master craftsman and a mad scientist in one body! Keep us informed how this all goes. Interesting.


Re: Experimental vacuum chamber
Posted: Tue Sep 17, 2019 5:17 pm
by tongueriver
Re: Experimental vacuum chamber
Posted: Tue Sep 17, 2019 5:55 pm
by Meridian_Mike
Interesting!
I can't wait to see your results!
Re: Experimental vacuum chamber
Posted: Wed Sep 18, 2019 12:12 am
by Byrd
I've done in in a home made double boiler setup using Minwax hardner as well. I had pretty good success with it but only on wood handles. I like your think and am interested in seeing your results. If you could use it to dye bone that would be cool!
Re: Experimental vacuum chamber
Posted: Wed Sep 18, 2019 4:23 pm
by Doc B
I can't speak to the use of vacuum in knives or dentistry. I can speak to the use of pressure in dentistry. We routinely used pressure pots, like these, doing acrylic work for dentures or acrylics, in dentistry. The pressure would virtually eliminate any visible bubbles within the resin.
I would be interested to see if it would be able to "drive" dye, into the bone.
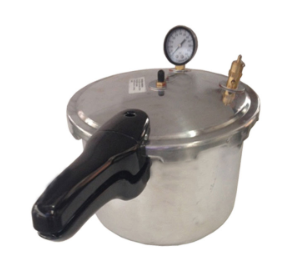
- pressure.png (72.19 KiB) Viewed 2292 times
Re: Experimental vacuum chamber
Posted: Wed Sep 18, 2019 4:31 pm
by Meridian_Mike
Interesting concept.....
using a pressure cooker as a pressure chamber. The lids lock on.... SO, how much pressure can these take before they explode? I guess you would force air into the cooker chamber through an air valve?
I remember my mom cooking with those old pressure cookers. She wouldn't let us get close to them while in use for fear we would do something to make them explode.....LOL.
Re: Experimental vacuum chamber
Posted: Wed Sep 18, 2019 4:59 pm
by Byrd
When I did it I used the same concept as a pressure cooker. I put the hardener in a mason jar along with the scales and sealed it with a new lid. I then put that in a pot of water and heated it on my Coleman stove. As the water boiled, the mason jar sealed and created a vacuum. You could see the bubbles as the air was forced out of the wood and the hardener sucked in. I let it cook until there were no more bubbles, then let everything cool before I removed the scales. It worked pretty well. I put the scales on a fixed blade and gave it to my Dad. Don't remember how long it took.
Re: Experimental vacuum chamber
Posted: Wed Sep 18, 2019 6:57 pm
by Reverand
Pressure cookers top out around 16psi, which is not much.
I bought the PVC fitting to build one as well, but haven't built it yet. I had thought to have 2 threaded caps: one for vacuum' and a separate one with a tire valve-stem for pressure.
First put the pieces under vacuum for 24 hours in the woid hardener, then swap lids and pump it up around 25psi with pressure and let it sit for 24 hours.
Re: Experimental vacuum chamber
Posted: Thu Sep 19, 2019 2:37 am
by Doc B
You'll see, on the picture I posted...the pressure pot is pre-pressurized...with an air hose...like filling your tire. You can cure it under pressure in cold water...or we would usually put warm water in it. It was never put on a stove and no additional heat was added to the process. I'm not saying you couldn't do something, with a regular pressure cooker...it would just be different and probably not as precise.
Re: Experimental vacuum chamber
Posted: Thu Sep 19, 2019 10:55 pm
by ea42
I'd definitely go with vacuum. You're probably going to need close to that 30Hg for a good hour. A clear container works best so you can see what's happening. You want to keep it under vacuum until you see no more bubbles coming out of your material. After all the air is drawn out shut your vacuum down and leave the material in the solution overnight. It takes at least that long for it to be drawn in.
Eric