Page 1 of 1
Tang repair experiment
Posted: Sat Nov 02, 2019 5:21 pm
by Reverand
I bought a cheap mid-70's or -80's Boker USA which was missing a shield and had a badly worn main. There was no snap to the main or the sheepsfoot beside it, and when closed the springs were sitting low: all classic signs or worn tangs.
And perfect for the experiment that I had in mind!
My plan is to silver-solder a thin piece of steel over the back of the tang.
Step 1: I start by heating and shaping an old hacksaw blade. It quickly heated red with a propane torch, and I bent it into a "U" shape with needle-nosed pliers.
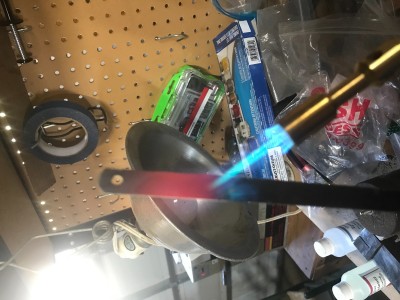
- Heating an old hacksaw blade
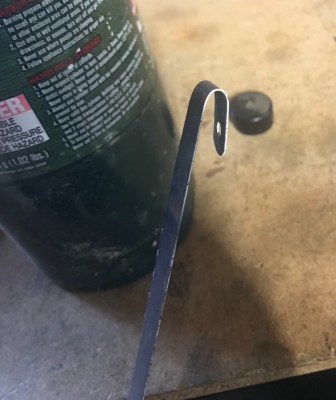
- Roughly bent into shape
Step 2: Clamp the blade in a large vise. Heat the metal again and shape it against the tang carefully. I really needed 3 hands for this part!
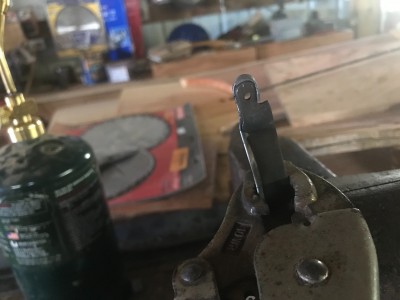
- Heated and shaped to fit the tang
Step 3: Cut off a slice of the shaped metal. I chose to make it almost double the width of the blade. Then I cleaned the edge of the tang and the inside edge of my metal 'shim' and carefully tinned them with solder, until the mating surfaces were fully coated (I had to file it clean and do this a couple of times until I had good coverage).
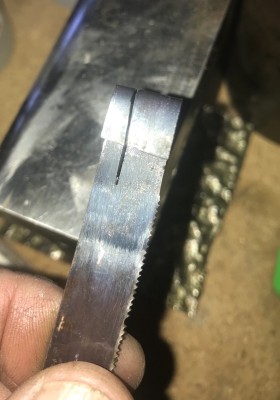
- Cutting off a slice
Step 4: Clamp the blade back in the vise, heat both pieces and clamp them together hard with pliers to squeeze out any extra solder. Hold it until the solder freezes.
Step 5: Clean it up with a grinder! There are some spots where I had to thin the shim down halfway to make it look right to me.
You can see that I did not get the solder perfect. I suspect that I need some better flux, as mine boils off too quickly.
I had to leave the shop to get ready for a family party, so I haven't finished the knife yet. But I did temporarily piece it together for a test fit by sliding nails in place of the pins, and it seemed to have great snap!
I will report back once I have finished it up. I may also do a few other of my cheaper knives like this, just to see if I can duplicate the results.
If it works at all, I think it was an hour well spent. We shall see!
Re: Tang repair experiment
Posted: Sat Nov 02, 2019 5:55 pm
by Byrd
That's ingenious! I'm interested to see how it works out.
Re: Tang repair experiment
Posted: Sat Nov 02, 2019 6:04 pm
by Jeffinn
Nice fix Rev!
Re: Tang repair experiment
Posted: Sat Nov 02, 2019 6:13 pm
by Colonel26
You sir are the king of solder! Fantastic, I am anxious to see how it works.
On that note, I wonder how the green lock tite would work in place of the solder? I know it’s a permanent bond and is used in firearms to lock liners into barrels and in shims to tighten old double barrels. Hmmmmmmm.
Re: Tang repair experiment
Posted: Sat Nov 02, 2019 6:38 pm
by orvet
A couple of observations: I wonder if resin core solder would've worked better than silver solder? (I don't know, just wondering. Resin core solder was used a lot on automobiles when I was growing up).
I don't see a heatsink in your pictures, did you use a heatsink to keep blade from overheating? I have a paste that I use that keeps the heat from traveling down the metal, and in this case into the edge.
I would be interested to see if the edge of your blade was affected by the heat, especially down by the tang. You could check this pretty easily by file testing it; if the file skates across the edge, it's hard but if the file bites into the metal then the treat is been lost or compromised.
Since you have another blade from the same knife that has not been heated, just run the file over it and it should skate. That will show you how the file feels on a hard blade and then compare that to how the file feels on the blade that was heated. There was no difference, you probably are okay.
You will know for sure if you EDC the knife for a while, and really put it to work; if the bottom part of the blade stays as sharp as the tip, you should be good to go.
You may already have checked all the stuff out, it's just that I am extremely cautious when it comes to heating a blade, or even a spring because the trading of both is critical to the proper function of the knife.
Whether it has affected the heat treat of the blade or not, and whether the process ultimately works long-term or not; I definitely give you mega props for thinking outside the box and doing something no one else is done!


Well done sir! I hope it works out well in your long term testing.

Re: Tang repair experiment
Posted: Sat Nov 02, 2019 7:55 pm
by Reverand
orvet wrote: ↑Sat Nov 02, 2019 6:38 pm
A couple of observations: I wonder if resin core solder would've worked better than silver solder? (I don't know, just wondering. Resin core solder was used a lot on automobiles when I was growing up).
I don't see a heatsink in your pictures, did you use a heatsink to keep blade from overheating? I have a paste that I use that keeps the heat from traveling down the metal, and in this case into the edge.
I would be interested to see if the edge of your blade was affected by the heat, especially down by the tang. You could check this pretty easily by file testing it; if the file skates across the edge, it's hard but if the file bites into the metal then the treat is been lost or compromised.
Since you have another blade from the same knife that has not been heated, just run the file over it and it should skate. That will show you how the file feels on a hard blade and then compare that to how the file feels on the blade that was heated. There was no difference, you probably are okay.
You will know for sure if you EDC the knife for a while, and really put it to work; if the bottom part of the blade stays as sharp as the tip, you should be good to go.
You may already have checked all the stuff out, it's just that I am extremely cautious when it comes to heating a blade, or even a spring because the trading of both is critical to the proper function of the knife.
Whether it has affected the heat treat of the blade or not, and whether the process ultimately works long-term or not; I definitely give you mega props for thinking outside the box and doing something no one else is done!
Well done sir! I hope it works out well in your long term testing.
Silver Solder is supposed to make a stronger bond than resin-core 'lead' solder (though it no longer contains lead, and isn't worth using without it.) It may not need to be that strong, Colonel26 might have as good an idea with the Loctite. I don't really know.
As far as a heat sink, I clamped it close to the choil in a large Blacksmiths vise, and purposefully on a cold morning. Immediately after soldering the blade was still cool to the touch. I hope that the vise kept everything cool enough.
I did not think to test with a file, but that is a great idea. I will do that and compare to the other blades as soon as I can, and post the results.
As long as I am experimenting, I may try something similar to the spring for the sheepsfoot blade, as a comparison.
Re: Tang repair experiment
Posted: Sat Nov 02, 2019 10:50 pm
by Bill DeShivs
If you used "real" silver solder (high temperature hard solder) the repair should last a long time. Of course the thin steel strip on the tang is not hardened, but it shouldn't matter for years.
Silver-bearing 4 % low temperature solder won't hold up well-nor will lead rosin-core solder.
I doubt any Lockite product product could hold up better that hard solder in this application.
Putting the blade in a vise is a great heat sink, and the blade heat treating should not be affected at all.
Re: Tang repair experiment
Posted: Sun Nov 03, 2019 12:04 am
by kentucky.2006
Nice job on that knife.
Jan
Re: Tang repair experiment
Posted: Sun Nov 03, 2019 4:42 pm
by Doc B
Re: Tang repair experiment
Posted: Mon Nov 04, 2019 1:34 pm
by Meridian_Mike
Great work!
I like the thinking you used for the shim.
That is similar to what you do to get a loose shotgun barrel back on face. You have to shim the hook.
Larry Potterfield shows how to do it with either soldier or green Loctite.
I can't wait to see the finished product!
Re: Tang repair experiment
Posted: Sat Nov 09, 2019 8:00 pm
by Reverand
Update:
Well, the results are mixed on this experiment. The "shim" on the tang restored the closing snap to the main blade, but opening snap is still a bit weak. I also did lose temper on about 1/16" of the blade just right next to the choil, but it is such a small amount that I still feel good about it. (Thank you, Dale, for having me check that!)
The sheepsfoot blade beside it, though, now works great!
The snap was very poor on both of these, and I decided to try soldering a shim onto the spring for this blade, rather than the tang.
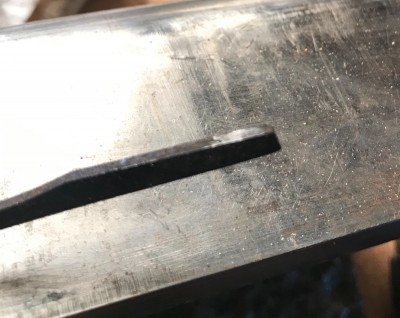
- Divot in spring
There was a sizeable divot in the springs for both blades. I cleaned and tinned a piece of the same hacksaw blade and roughly sliced it into thirds with a Dremel.
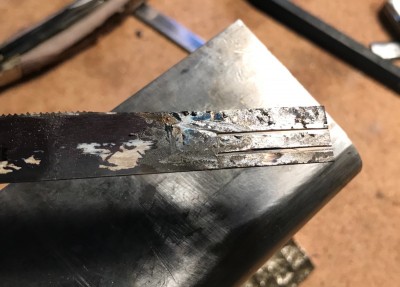
- Hacksaw blade
Then I cleaned and tinned the springs, soldered the shims onto them, and cleaned them on a grinder and sander.
The top spring is for the Main blade. I sanded the spring down a bit to remove the divot and installed that shim so that the spring was at it's original height, only now with a flat surface. On the bottom spring I soldered in two thicknesses of shims to build it up higher.
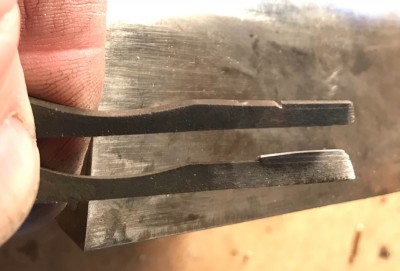
- Two springs shimmed and cleaned
At first the walk felt a tad gritty, but after oiling everything and working the blades for quite a while, I am seeing some improvement. I think that my peening may have been part if the problem. Even the opening snap on the main is a bit better.
I am going to use this as an EDC for a while, and report on it.
Re: Tang repair experiment
Posted: Mon Nov 11, 2019 12:54 pm
by Meridian_Mike
Good work Reverand!
Opening and closing will get that bad boy working a lot better. I like this method of shimming a spring.
2 thumbs up!