Page 1 of 1
Valley Forge plier knife
Posted: Tue Feb 27, 2018 3:51 pm
by OLDE CUTLER
I picked up this
Valley Forge plier knife at a local gunshow for $5 recently. The tang stamp on both blades is "Sterling Service". I had never seen one of these before, so I posted pictures of it on AAPK and several people gave me info on what it was and about when it was made. I found some pictures of originals, and saw that the originals have bone handles. This one had been reworked at some point in time, and had aluminum handles when I got it, which were nothing but UGLEEEEE! Fortunately, the plier had not been abused over its lifetime, as I am sure many of these were. The jaws close together tightly and the tiny wire cutter works good.
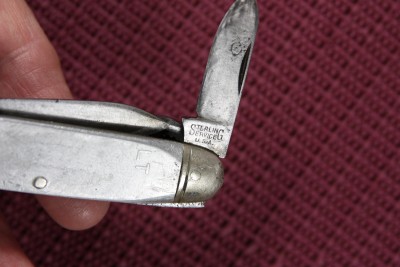
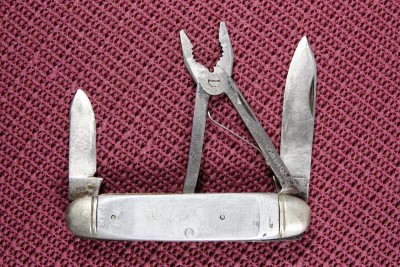
So to return it to something like original condition, I wanted to make new bone handles as the original maker would have done. After watching some muskratman videos on cutting the handle material from bones (thanks muskratman), I found some Angus beef femur at our local Petsmart for a few bucks and decided to try it. I sawed the slabs and used the disc sander to flatten the back and shape them.
When it came to jigging the bone, I studied pictures of the originals, and the bone handles on some old original pocket knives I have and was kind of undecided on how to proceed with a jigging style. After hee-hawing around on this, I finally decided to go ahead with a "random" pattern of jigging using a small ball end bit in the Dremel tool.
I got it back together yesterday and it turned out good.
The only minor trouble I had was in the dying of the bone slabs. I have a book on knife repair by Adrian Harris where he uses leather dye for dying the bone. I had some dark brown on hand, so decided to try it. It took several applications to get it dark enough. Another book I have by Ben Kelley Jr. suggests using potassium permanganate to dye bone, which I might try next time. I was wondering what you knife mechanics who are reading this would suggest from your experience with dying bone when making your own slabs? Anyway it is done now and in my pocket as an EDC. I wonder how many of you have an Angus beef bone, freshly rehandled
Valley Forge plier knife in your pocket now as an EDC?
Re: Valley Forge plier knife
Posted: Tue Feb 27, 2018 4:26 pm
by Beavertail
Beautiful job!
I think it looks great!

Re: Valley Forge plier knife
Posted: Tue Feb 27, 2018 4:39 pm
by gypsy jim
Nice job!
Re: Valley Forge plier knife
Posted: Tue Feb 27, 2018 4:47 pm
by doglegg
OLDE CUTLER wrote:I picked up this Valley Forge plier knife at a local gunshow for $5 recently. The tang stamp on both blades is "Sterling Service". I had never seen one of these before, so I posted pictures of it on AAPK and several people gave me info on what it was and about when it was made. I found some pictures of originals, and saw that the originals have bone handles. This one had been reworked at some point in time, and had aluminum handles when I got it, which were nothing but UGLEEEEE! Fortunately, the plier had not been abused over its lifetime, as I am sure many of these were. The jaws close together tightly and the tiny wire cutter works good.
IMG_1991.JPG
IMG_1992.JPG
So to return it to something like original condition, I wanted to make new bone handles as the original maker would have done. After watching some muskratman videos on cutting the handle material from bones (thanks muskratman), I found some Angus beef femur at our local Petsmart for a few bucks and decided to try it. I sawed the slabs and used the disc sander to flatten the back and shape them.
IMG_2008.JPG
IMG_2009.JPG
When it came to jigging the bone, I studied pictures of the originals, and the bone handles on some old original pocket knives I have and was kind of undecided on how to proceed with a jigging style. After hee-hawing around on this, I finally decided to go ahead with a "random" pattern of jigging using a small ball end bit in the Dremel tool.
IMG_2013.JPG
I got it back together yesterday and it turned out good.
IMG_2014.JPG
IMG_2015.JPG
The only minor trouble I had was in the dying of the bone slabs. I have a book on knife repair by Adrian Harris where he uses leather dye for dying the bone. I had some dark brown on hand, so decided to try it. It took several applications to get it dark enough. Another book I have by Ben Kelley Jr. suggests using potassium permanganate to dye bone, which I might try next time. I was wondering what you knife mechanics who are reading this would suggest from your experience with dying bone when making your own slabs? Anyway it is done now and in my pocket as an EDC. I wonder how many of you have an Angus beef bone, freshly rehandled Valley Forge plier knife in your pocket now as an EDC?
I bet you are the only one. That is a great job. I don't know what it looked like new but it could not been as good as this.
Re: Valley Forge plier knife
Posted: Tue Feb 27, 2018 5:31 pm
by muskrat man
PP is my preferred method of dyeing. Degrease the bone good first and have it fit down and finish sanded 100%. Do not buff before dyeing, apply the dye until you get the color you want, then VERY LIGHTLY buff it to shine. You can also seal it with something like minwax wood hardener to seal the dye in. Leather dye and PP are both surface dyes and will eventually wear off or lighten in color unless sealed.
Jigging and dyeing the bone were going to be part of the series you watched, just never had time to finish the series out

Re: Valley Forge plier knife
Posted: Tue Feb 27, 2018 5:50 pm
by orvet
That's a very nice job, both the jigging and the color came out nice.
Nice rich color to the bone.

OLDE CUTLER wrote: I was wondering what you knife mechanics who are reading this would suggest from your experience with dying bone when making your own slabs?
I have jigged and dyed bone but I usually buy white bone slabs to avoid the hassle of boiling out the fat, cutting them up, flattening them out, etc. Culpepper has 3" X 1" and undyed bone slabs for 75¢. So at $1.50 a pair I figure it's more cost-effective to buy them than make them. My wife is pretty tolerant of my hobby however, a large pot of boiling beef bones on the stove might be a little more than she could handle. LOL
I have dyed bone and stag by soaking them in tobacco and also in tea. The results were not spectacular in my opinion. I also used Rit cloth dye, leather dye and potassium permanganate. PP is what I use most these days.
The other thing I consider is the time involved in doing it yourself, especially if you're repairing knives or doing custom work for people. It seems to me to be much faster and more cost-effective to buy bone that is a close match to the original instead of having to produce each set of bone handles individually. I think in the old cutleries in Sheffield had people who made the bones, stag, ivory, etc. handles for their cutlers.
I would not be surprised if that aluminum handle was original to the knife, or at least one of the options available. Aluminum handles were only found on the best knives because prior to the invention of a new refining process using electricity, (circa 1920s or 30s I think), aluminum was incredibly expensive to make and therefore was very expensive in any application where it was used.
I have a Marshall Wells Zenith knife with aluminum handles. Though it has been badly misused and abused you can still tell that it was a very nice knife at one time, probably the pride of the fellow that owned it.
Re: Valley Forge plier knife
Posted: Tue Feb 27, 2018 6:07 pm
by TwoFlowersLuggage
Probably a silly question, but that never stops me... Does the jigged area take the dye darker, like different grains in wood? Or is there some other process done that makes the jigging darker?
Re: Valley Forge plier knife
Posted: Tue Feb 27, 2018 6:27 pm
by OLDE CUTLER
orvet wrote:That's a very nice job, both the jigging and the color came out nice.
Nice rich color to the bone.
OLDE CUTLER wrote: I was wondering what you knife mechanics who are reading this would suggest from your experience with dying bone when making your own slabs?
I have jigged and dyed bone but I usually buy white bone slabs to avoid the hassle of boiling out the fat, cutting them up, flattening them out, etc. Culpepper has 3" X 1" and undyed bone slabs for 75¢. So at $1.50 a pair I figure it's more cost-effective to buy them than make them. My wife is pretty tolerant of my hobby however, a large pot of boiling beef bones on the stove might be a little more than she could handle. LOL
I have dyed bone and stag by soaking them in tobacco and also in tea. The results were not spectacular in my opinion. I also used Rit cloth dye, leather dye and potassium permanganate. PP is what I use most these days.
The other thing I consider is the time involved in doing it yourself, especially if you're repairing knives or doing custom work for people. It seems to me to be much faster and more cost-effective to buy bone that is a close match to the original instead of having to produce each set of bone handles individually. I think in the old cutleries in Sheffield had people who made the bones, stag, ivory, etc. handles for their cutlers.
I would not be surprised if that aluminum handle was original to the knife, or at least one of the options available. Aluminum handles were only found on the best knives because prior to the invention of a new refining process using electricity, (circa 1920s or 30s I think), aluminum was incredibly expensive to make and therefore was very expensive in any application where it was used.
I have a Marshall Wells Zenith knife with aluminum handles. Though it has been badly misused and abused you can still tell that it was a very nice knife at one time, probably the pride of the fellow that owned it.
Thanks for the comments everyone. I too think it is a lot of extra work to make bone slabs from bones, but wanted to try it just once
Dale
The reason I did not think that the aluminum handles were original is that I found an old link on AAPK with some good pictures which showed the bone handles and a shield. If you look closely at my pics of the aluminum handles still on the knife, the rear aluminum handles had no handle pins in it other than the rocker pin. There were 3 unused handle pin holes in the rear liner plus the rocker pin. On the front aluminum handles, there were 2 handle pins, one in the pen blade end, and one thru what would have been the shield pin hole, plus the rocker pin. On the front liner there were the 3 pin holes, plus the shield pin hole, plus the rocker pin. I used 3 handle pins per side plus the rocker pin for fastening the new bone handles. I did not use the old shield pin hole on the front bone handle. So judging that the handle pin holes in the liners were not all used, I thought it likely that the aluminum handles were not original.
You could have told our wife you were making soup! LOL
Re: Valley Forge plier knife
Posted: Tue Feb 27, 2018 6:32 pm
by OLDE CUTLER
TwoFlowersLuggage wrote:Probably a silly question, but that never stops me... Does the jigged area take the dye darker, like different grains in wood? Or is there some other process done that makes the jigging darker?
I think it may be that way because the dye sits in a little puddle in each of the jigged depressions and that way gets more dye than the top surface. Just my guestimation.
Re: Valley Forge plier knife
Posted: Tue Feb 27, 2018 9:29 pm
by Jeffinn
That turned out great OC!
Do you guys shape your bone by hand or do you use belt sanders (or both)? And do you shape the handles before attaching them or after?
Thanks!
Re: Valley Forge plier knife
Posted: Tue Feb 27, 2018 10:08 pm
by OLDE CUTLER
Jeffinn wrote:That turned out great OC!
Do you guys shape your bone by hand or do you use belt sanders (or both)? And do you shape the handles before attaching them or after?
Thanks!
After bandsawing the blanks, I flattened the back and did the rough shaping with a 9" disc sander. For rounding over the edges and final shaping I used a Dremel too with a sanding drum. But that is just what I have available. I did a very close fit to the liners before doing the jigging, then pinned the handles on and did a final fit. I do some hand sanding for the final fit and smoothing.
Re: Valley Forge plier knife
Posted: Tue Feb 27, 2018 10:14 pm
by Jeffinn
Thank you sir. I’m still trying to find my way with certain processes so it’s always nice to get some input from the pros that have been doing this awhile. I always appreciate the feedback!
Re: Valley Forge plier knife
Posted: Tue Feb 27, 2018 11:28 pm
by FRJ
Great job on that knife, Olde Cutler.
Re: Valley Forge plier knife
Posted: Wed Feb 28, 2018 12:00 am
by just bob
It's been discussed on here before about using a vacuum to dye bone. I happened to run into Bob Neal at the knife show in Lexington last year and he got one of these units fixed up and was very happy with it. Had a lot of bone samples he had dyed and was showing about. Look at these;
https://www.youtube.com/watch?v=sx5BW-aAR1I
viewtopic.php?f=37&t=39642&p=384348&hil ... um#p384348
Re: Valley Forge plier knife
Posted: Thu Mar 01, 2018 1:19 am
by glennbad
Hey, that looks good! Definitely an upgrade with the bone!